

Document History
|
Version |
Author |
Reviewer/Approver |
Date of Issue |
Page / Section |
Brief Description |
|---|---|---|---|---|---|
|
0.1 |
Deema Z. |
Asma L. |
|
Billing |
Initial Draft |
|
0.2 |
Deema Z. |
Bara’ A. |
|
Billing |
Final Review |
Glossary
|
Term |
Definition |
|---|---|
|
COD Shipments |
COD shipments is a way of buying goods online where the customer pays for the purchase in cash or by card when the package is delivered to their doorstep, instead of paying upfront. It's a convenient option for those who prefer to pay upon receiving their items. |
|
MAWB |
Master Air Waybill which represents the master shipment ID that consists of multiple shipments. |
|
Shipping Charges |
The fees associated with the transportation of goods from origin to destination. |
|
Customs Charges |
The fees imposed by customs authorities on imported or exported goods. These charges cover duties, taxes, and other levies that are necessary for regulatory compliance and entry of goods into a specific country. |
|
Additional Charges |
Extra fees beyond standard shipping costs, often incurred due to special services or circumstances such as express shipping, handling of oversized items, or specific delivery requirements. |
|
Surcharges |
Additional fees applied to shipping costs, often due to specific conditions like fuel price fluctuations, peak seasons, or special handling requirements. |
|
First Mile Charges |
The costs associated with the initial stage of the transportation process, starting from the point of origin or the supplier's location. These charges cover activities such as pickup, packaging, and the transportation of goods from the supplier to a distribution center, port, or the next stage of the supply chain. |
|
Last Mile Charges |
The expenses incurred during the final stage of the transportation process, typically involving the delivery of goods from a distribution center, transportation hub, or port to the end customer's location. These charges encompass activities like local delivery, handling, and often include costs associated with overcoming the unique challenges of delivering goods to the end recipient, such as residential areas or congested urban environments. |
1. Ratesheet Management
The purpose of this feature is to manage the billing ratesheet which handles the shipping charges pricing structure and their related settings.
1.1 View Ratesheet
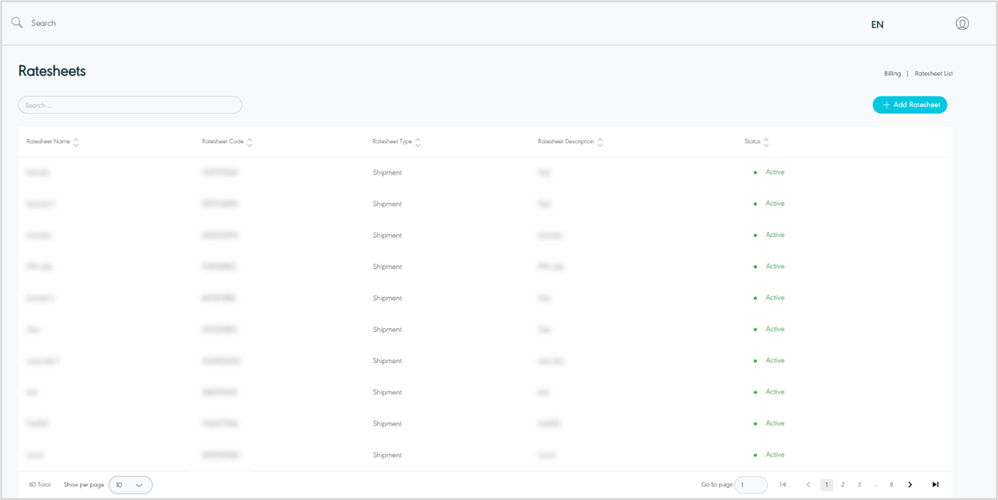
The user can view the defined rate sheets in the system by navigating to the ‘Ratesheets’ screen via the Billing Module from the left navigation panel as follows:
-
Add Ratesheet: the user can add a ratesheet by clicking on Add Ratesheet, referring to the Add Ratesheet section.
-
Search: the user can search for the ratesheet by typing in the search filter field.
-
Show Per Page: the user can select the number of items to show on each page.
-
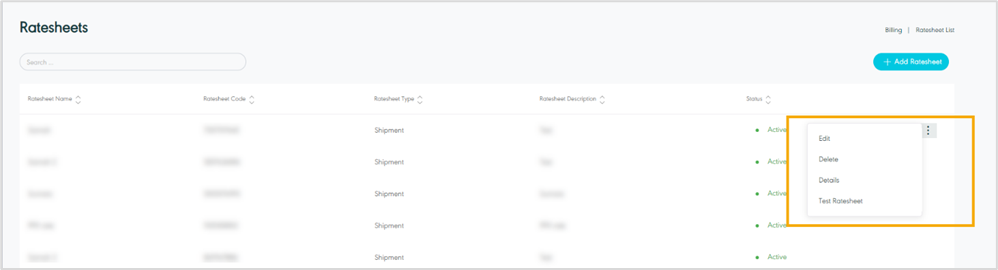
Actions: by clicking on this button the user can view specific ratesheet details referring to View ratesheet Details, edit ratesheet by referring to Edit Ratesheet,, delete ratesheet, manage product by referring to Manage Product, and test ratesheet by referring to Test Ratesheet as follows:
1.4 View Ratesheet Details
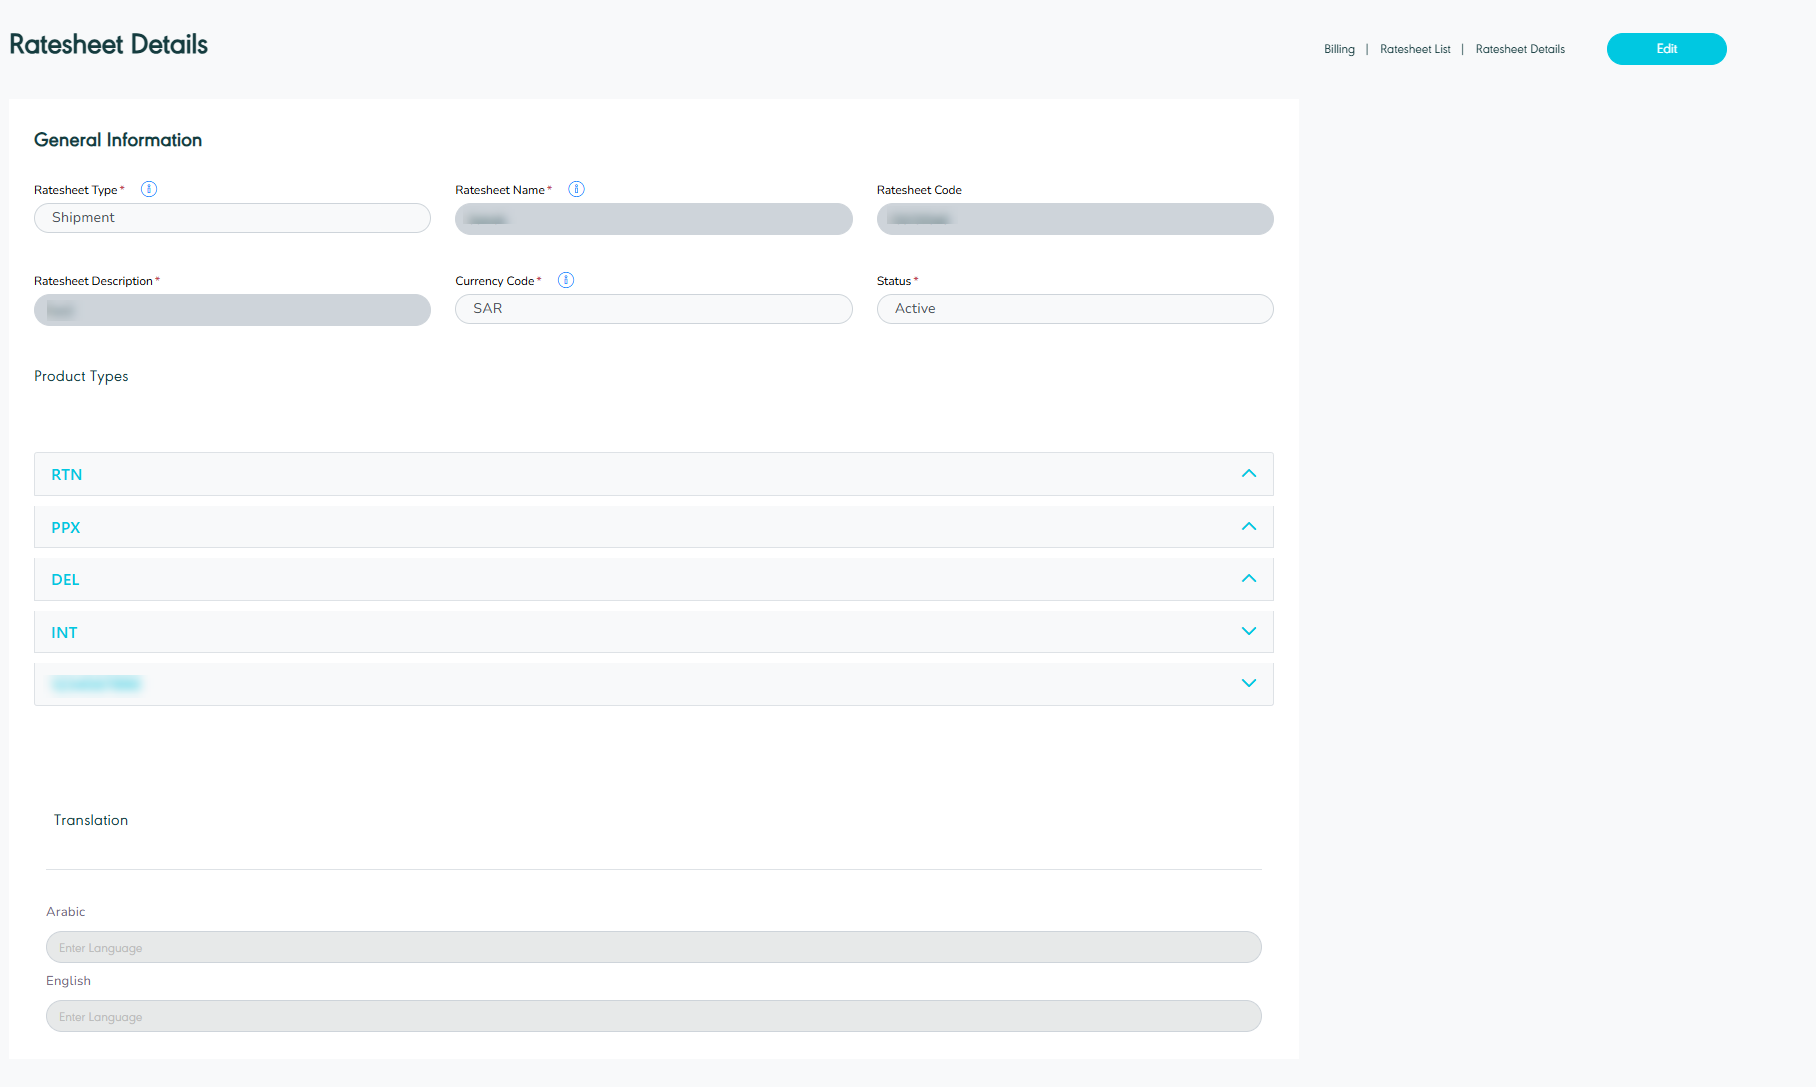
The user can view the ratesheet details by navigating to the ‘Ratesheet’ screen via the Billing Module and clicking on Details from Actions as follows:
1.3 Add Ratesheet
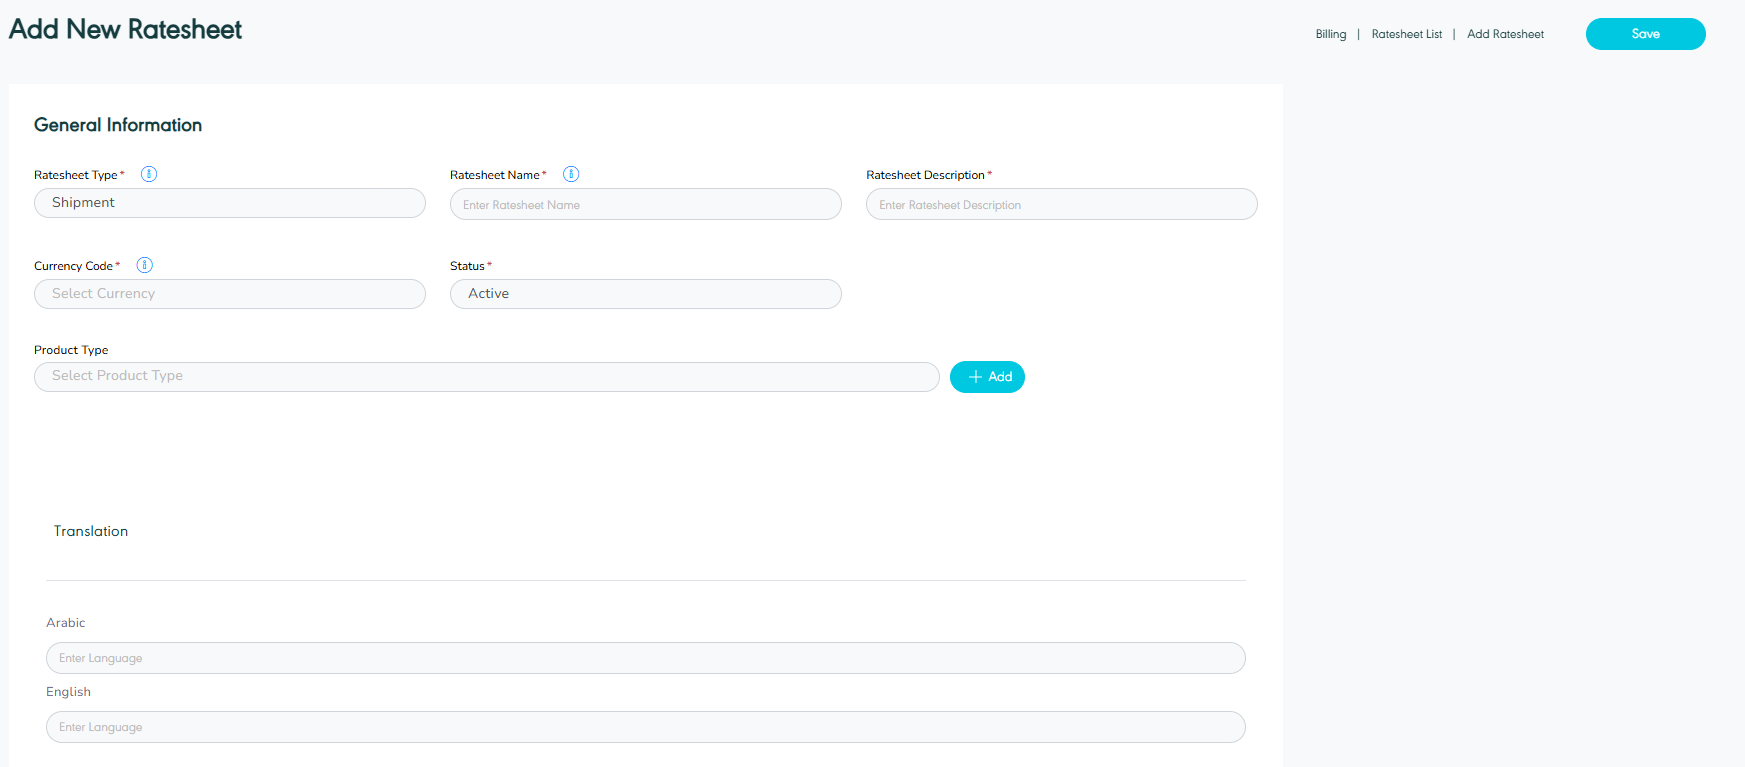
The user can add a new ratesheet by navigating to the ‘Ratesheet’ screen via Billing Module and clicking on Add Ratesheet as follows:
-
Ratesheet Name: this field represents the ratesheet’s name.
-
Ratesheet Type: this field represents ratesheet’s type.
-
Ratesheet Description: this field represents the ratesheet’s description.
-
Currency Code: this field represents the ratesheet’s currency.
-
Ratesheet Handler: this field represents the custom processor that supports multiple Excel templates.
-
Branch Status: this field represents the branch status where active means that the branch is currently functioning with SPL and inactive means that the branch is no longer using the SPL system.
-
Product Type: this field represents the ratesheet product service. e.g.: DLV: Home Delivery, PUD: Office Drop off, or PSD: Parcel Station Drop off.
-
Translation: this field represents the translations of the ratesheet.
By clicking on Save, the system adds a new ratesheet successfully.
1.4 Edit Ratesheet
The user can edit the ratesheet information by navigating to the ‘Ratesheet’ screen via the Billing Module and clicking on Edit from Actions as follows:
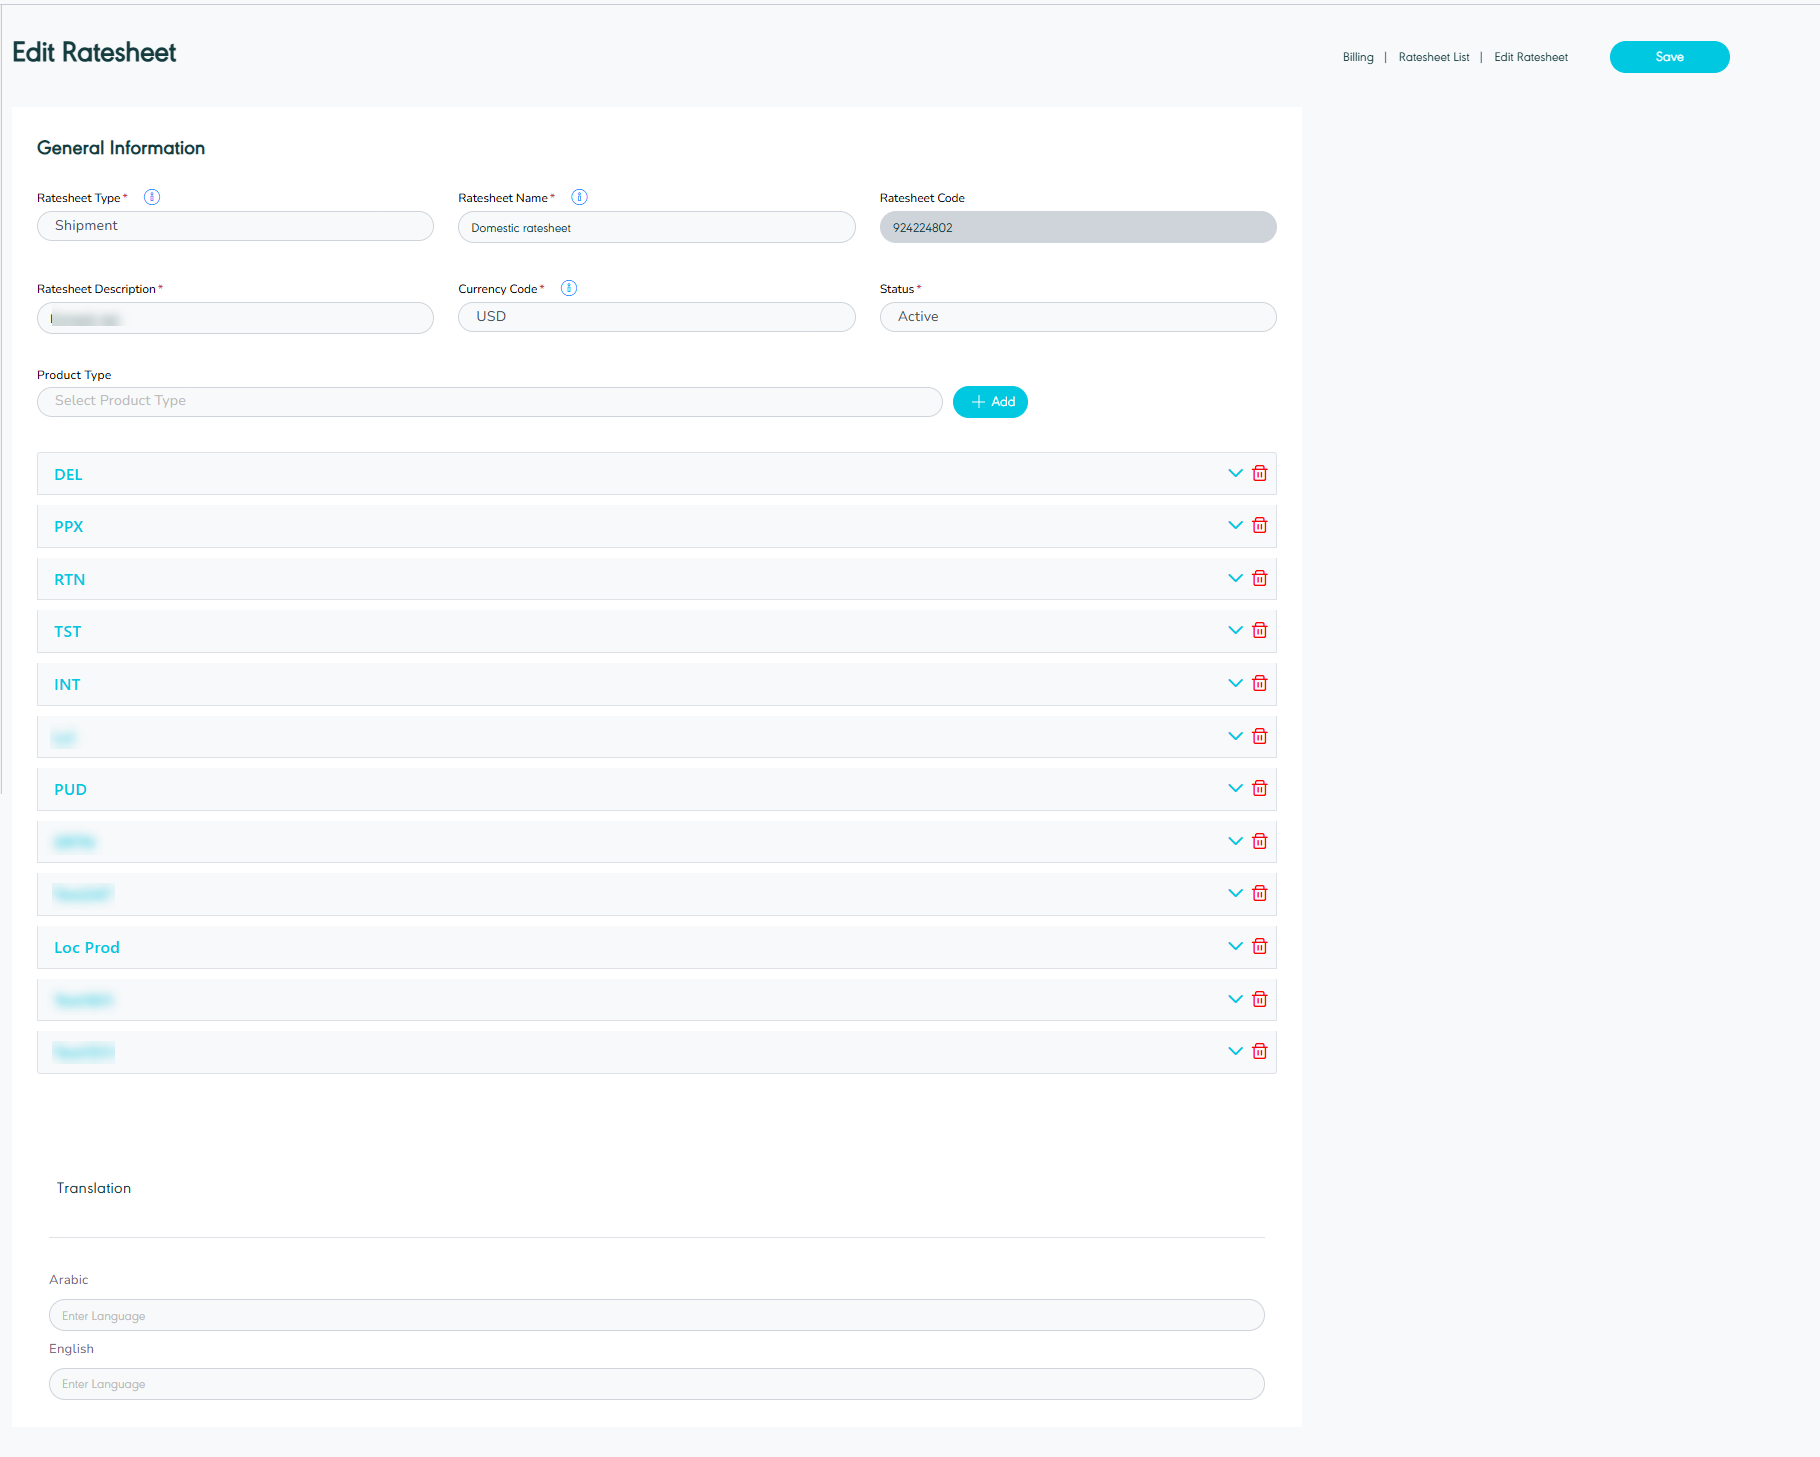
By clicking on Save, the system updates the reatesheet successfully.
1.5 Manage Product
The user can define the zones and link them with the ratesheet by navigating to the ‘Ratesheet’ screen via the Billing module and clicking on Edit from Actions then choosing the required Product Type. Once the product type is chosen, it will be listed below, as follows:
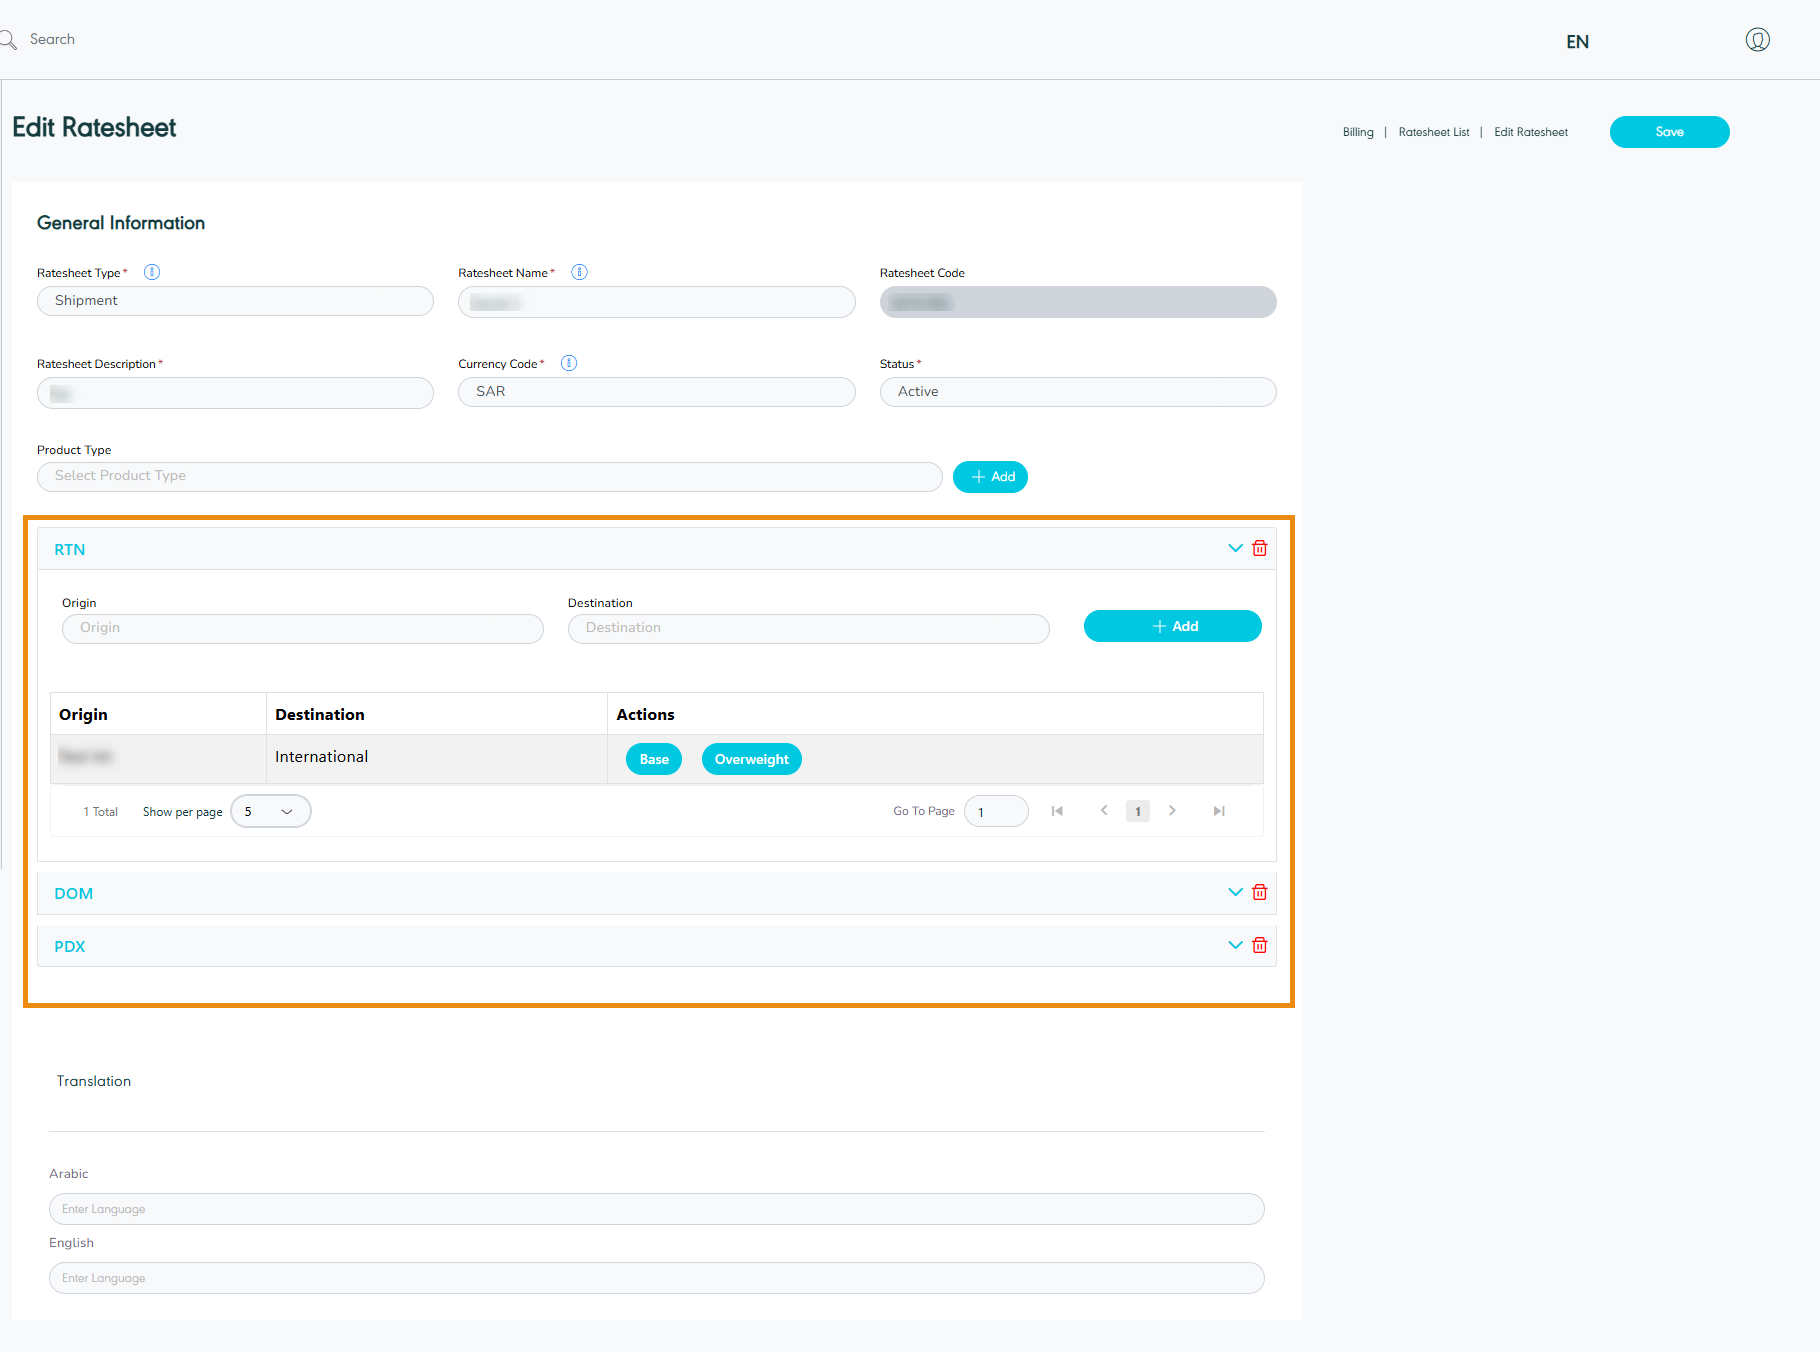
Once the product type is listed, the user can perform the below action when clicking on the Actions:
-
Manage Zone: the user can add zones to the ratesheet based on the product type workflow (international or local).
-
Remove: the user can remove the added product type.
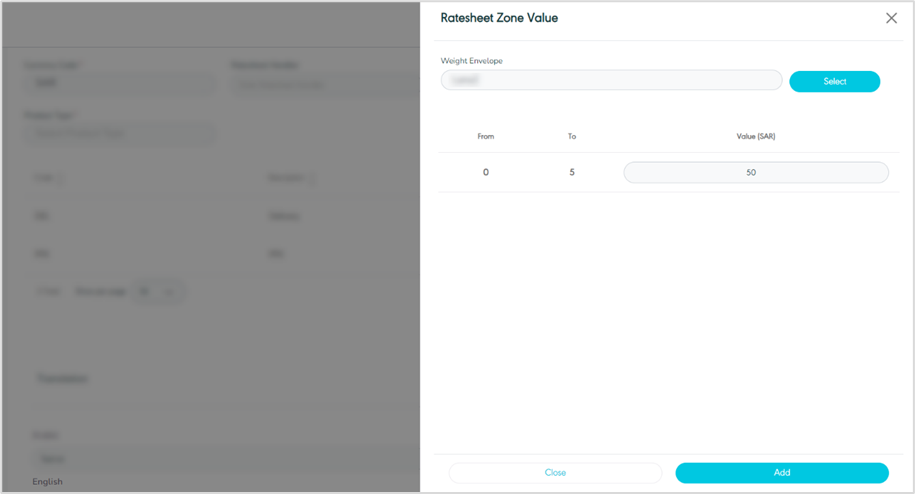
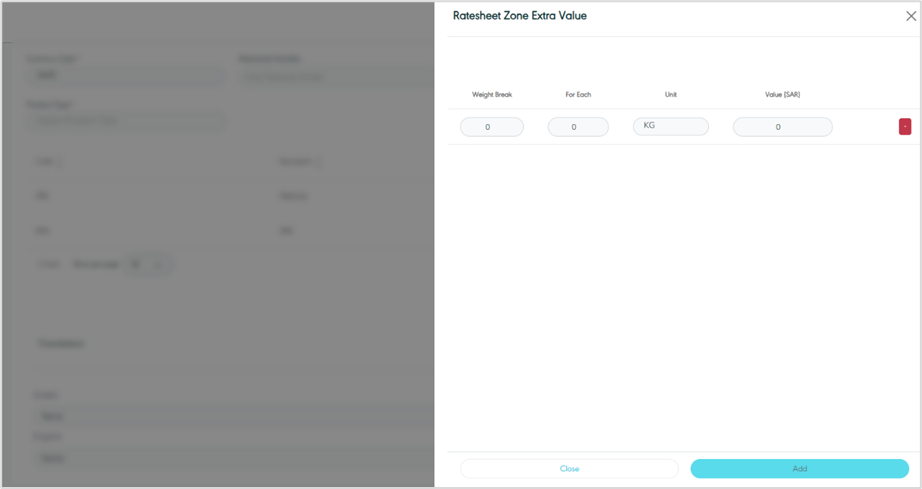
The user can manage the zone value of the added product type by clicking on Zone Details through Actions and choosing one of the below options:
-
Base: the user can define the shipping charges value per weight breakdown.
-
Over Weight: the user can define the shipping charges value for the extra value.
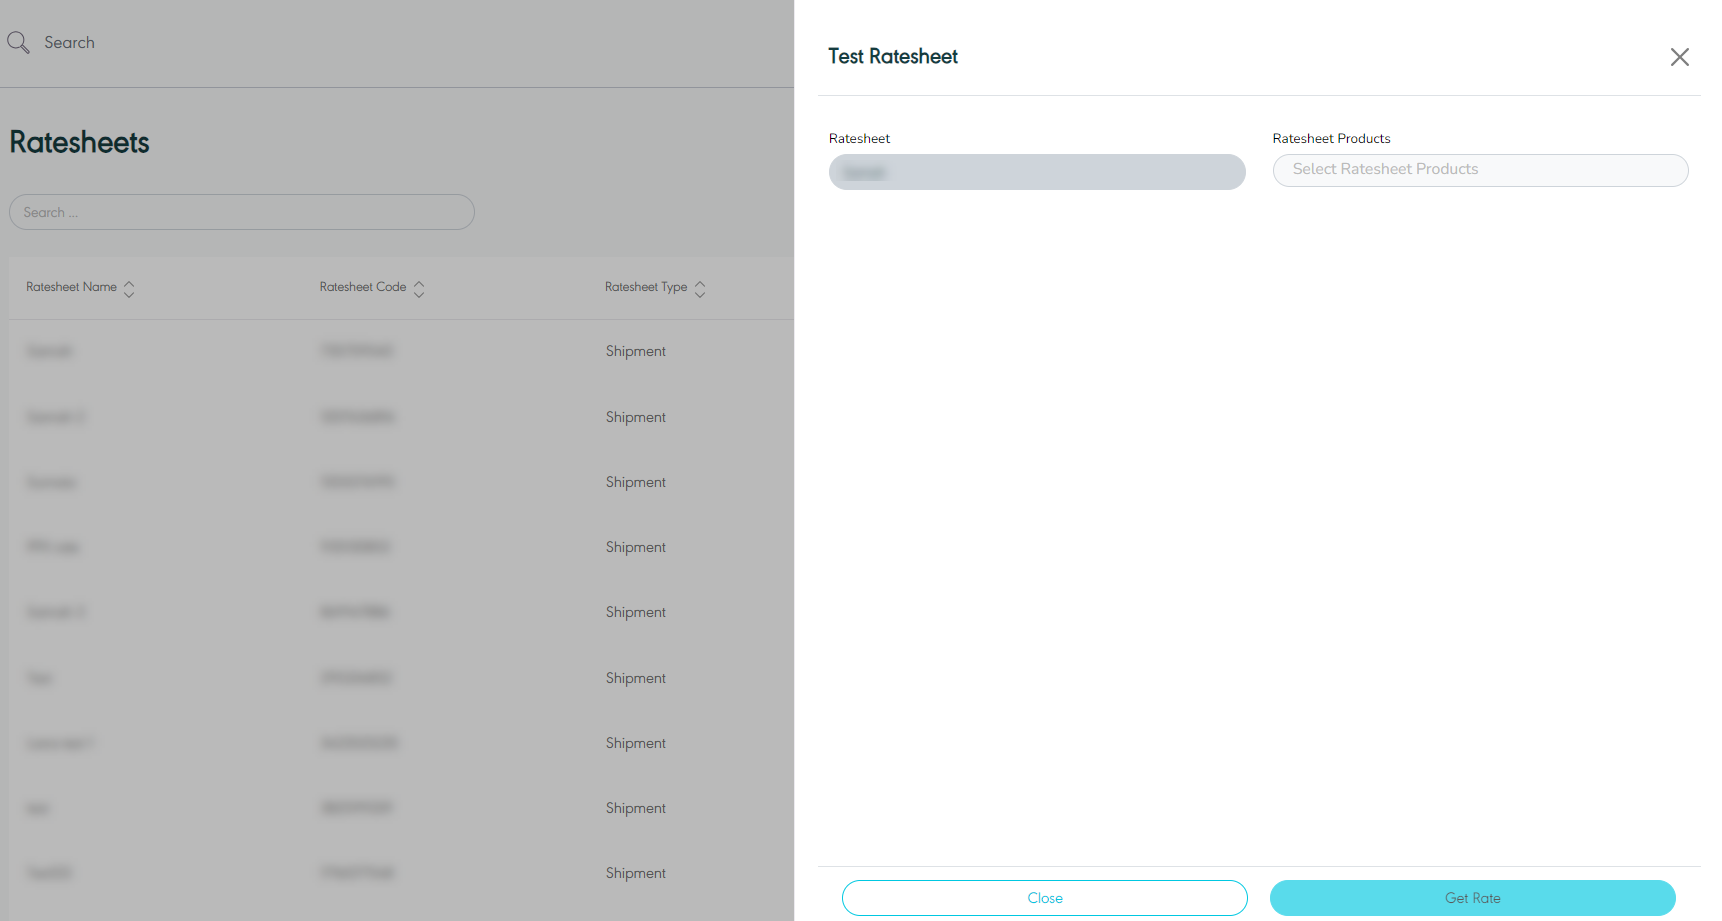
1.6 Test Ratesheet
The user can test the ratesheet by navigating to the ‘Ratesheet’ screen via the Billing Module and clicking on Test Ratesheet from Actions, as follows:
2. Surcharges Management
The purpose of this feature is to define and manage the surcharges along with their associated configurations. Surcharges are linked to Product service and product type; examples are insurance and high-value items surcharges.
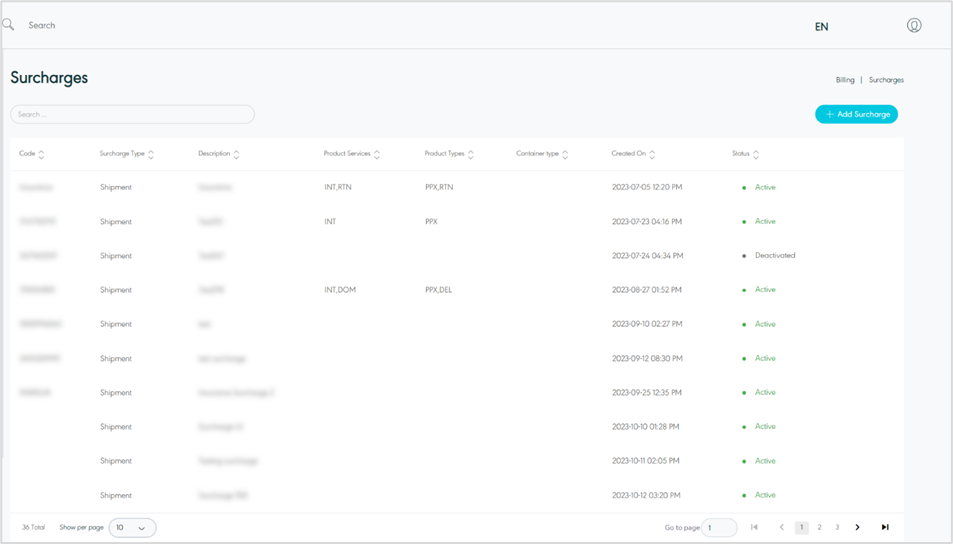
2.1 View Surcharge
The user can view the defined surcharge in the system by navigating to the ‘Surcharges’ screen by choosing the Billing Module from the left navigation panel as follows:
-
Search: the user can search for the surcharges by using the search filter field.
-
Show Per Page: the user can select the number of items to show on each page.
-
Add Surcharge: the user can add a new surcharge by clicking on Add Surcharge, referring to the Add Surcharge section.
-
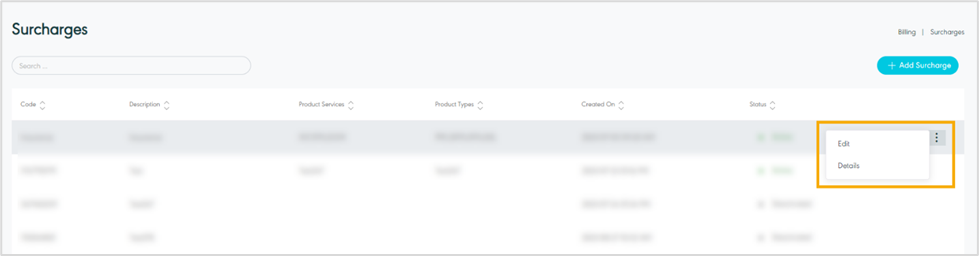
Actions: by clicking on this button the user can view specific surcharge details by referring to View Surcharge Details and edit surcharge by referring to Edit Surcharge as follows:
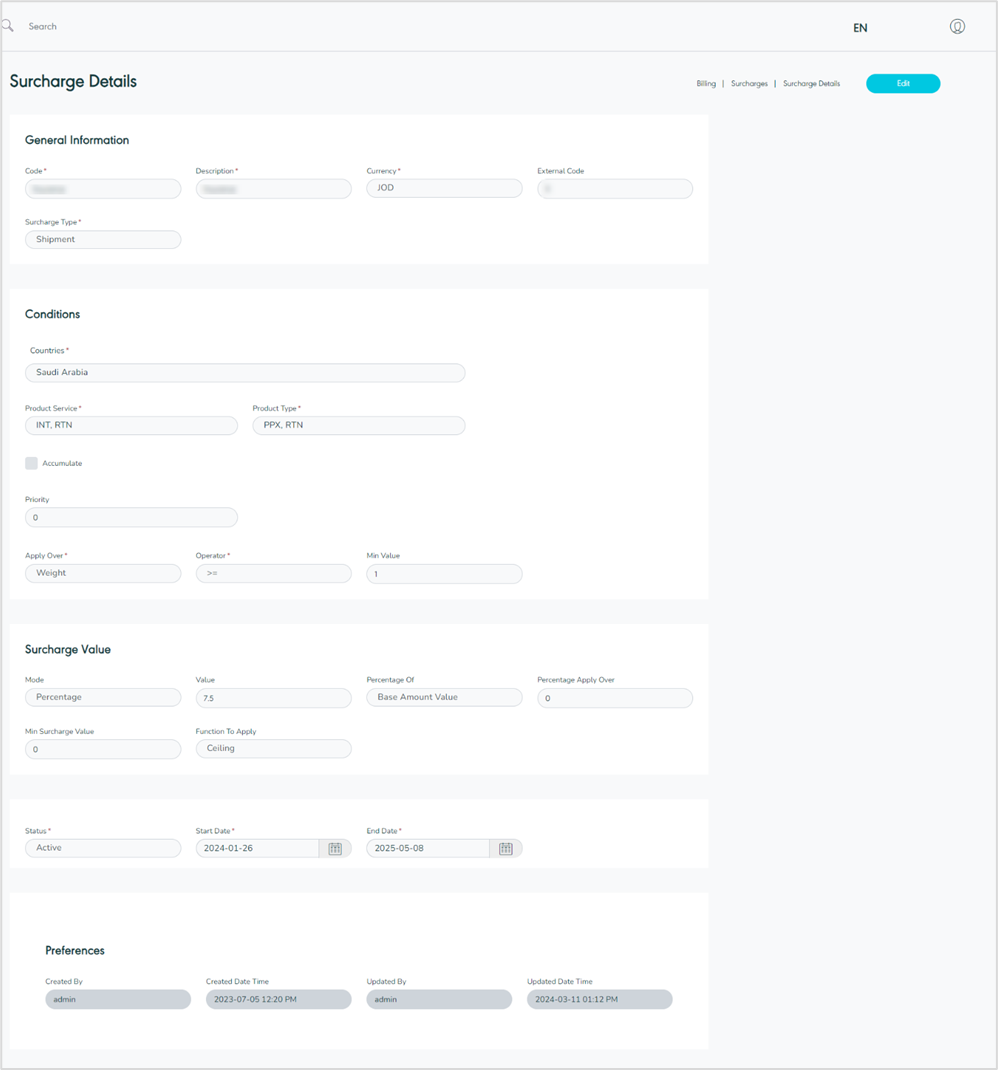
2.2 View Surcharge Details
The user can view the details of the surcharge by navigating to the ‘Surcharges’ screen via the Billing Module and clicking on Details from Actions as follows:
-
By clicking on the Surcharges in the page breadcrumb, the user goes back to the surcharges list.
2.3 Add Surcharge
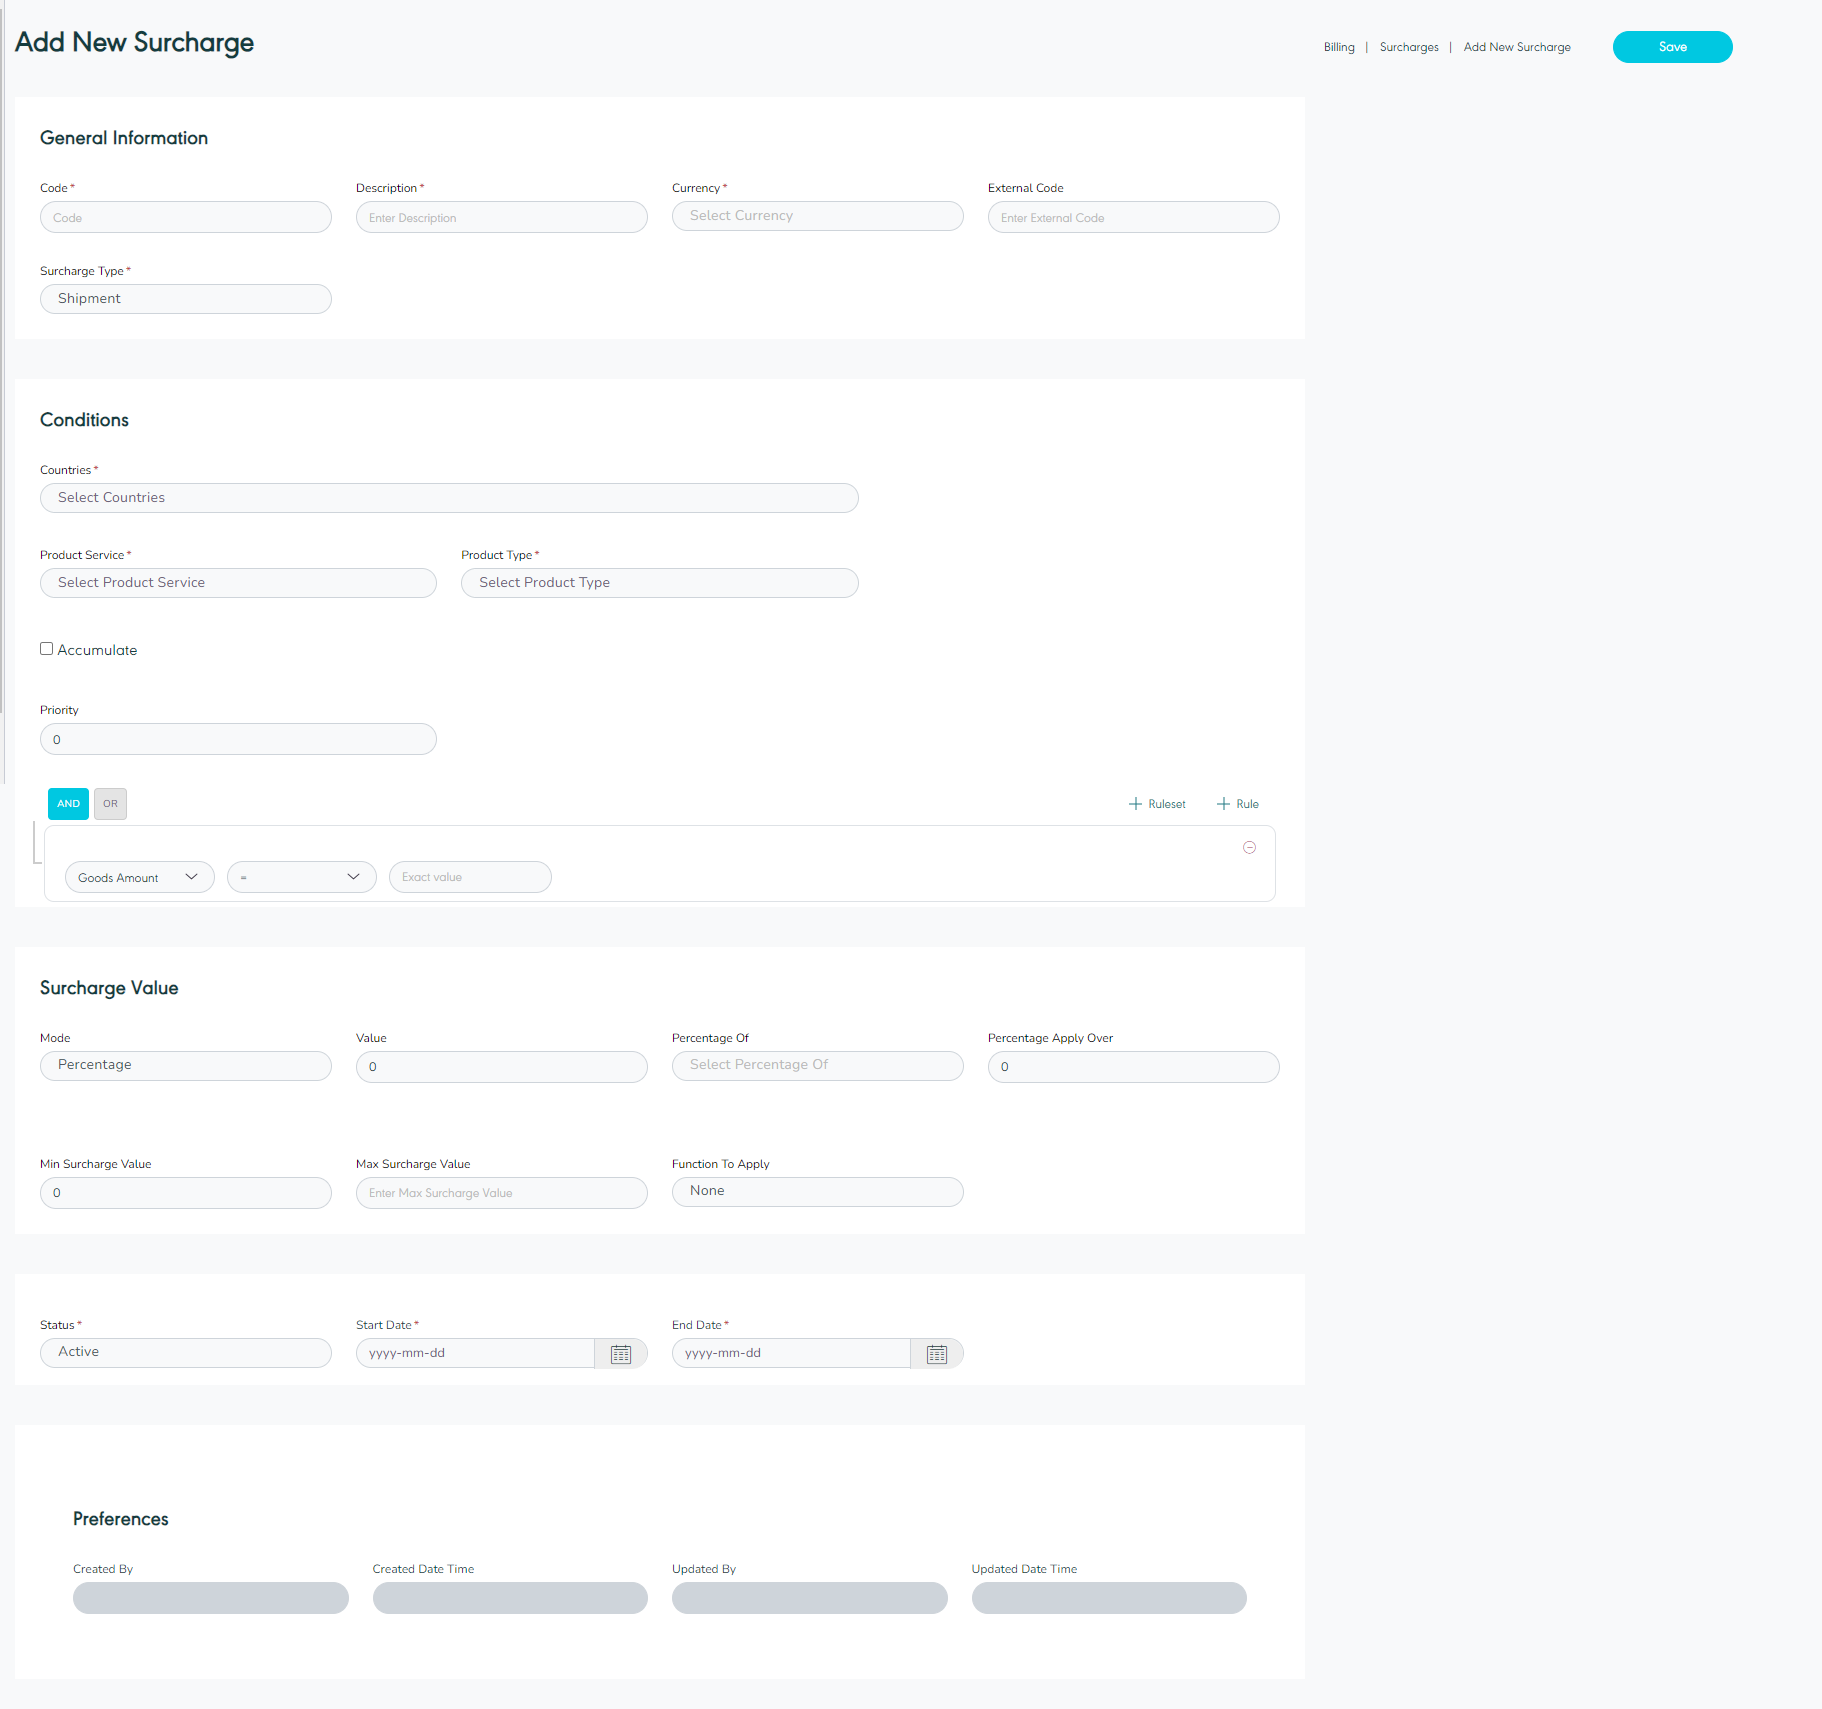
The user can add a new surcharge by navigating to the ‘Surcharges’ screen via Billing Module and clicking on Add Surcharge as follows:
-
Code: this field represents any unique alphanumeric value.
-
Description: this field represents the surcharges’ description.
-
Currency: this field represents the surcharges’ currency
-
External Code: this field represents the customer’s service ID for integration purposes.
-
Surcharge Type: this field represents the surcharges’ type that applies either to shipments or container.
-
Countries: This field represents the countries to which surcharge will be applied.
-
Product Service: this field represents the product service surcharges: International or Domestic.
-
Product Type: this field represents the delivery type of the product service. e.g.: DLV: Home Delivery, PUD: Office Drop off, or PSD: Parcel Station Drop off.
-
Accumulate: by marking this option, the system will consider any other related charges when calculating this surcharge.
-
Priority: If there are multiple surcharges defined on shipment level, then the execution of the surcharges will be according to the surcharge priority defined.
-
Surcharges Conditions: this field represents the ability to apply surcharges over multiple fields (Goods Amount, Weight, etc.) using rules and rulesets similar to the solution implemented on the additional charges conditions.
-
Apply Over: this field represents the criteria for which the surcharge will apply e.g., Goods Value, Weight, COD Value, and Base Amount Value.
-
Operator: this field represents mathematical symbols e.g., <,>, =, <=,>= etc....
-
Min Value: this field represents the minimum allowed value for applying for surcharges.
-
Mode: this field represents the methods of calculating surcharges e.g.: Percentage or Flat rate.
-
Value: this field represents the value to apply on the selected mode.
-
Percentage of: this field represents the percentage ratio that applies to the surcharge.
-
Percentage Apply Over: this field represents the surcharges’ minimum value for the percentage mode.
-
Min Surcharge Value: this field represents the surcharges’ minimum value.
-
Function To Apply: this field represents the rounding type.
-
Status: this field represents the status where active means that the surcharge is currently functioning with SPL and inactive means that the surcharge is no longer active in the SPL system
-
Start Date: this field represents the start date of enabling the surcharge.
-
End Date: this field represents the end date of disabling the surcharge.
By clicking on Save, the system adds new surcharges successfully.
2.4 Edit Surcharges
The user can edit the surcharge information by navigating to the ‘Surcharges’ screen via the Billing Module and clicking on Edit from Actions, as follows:
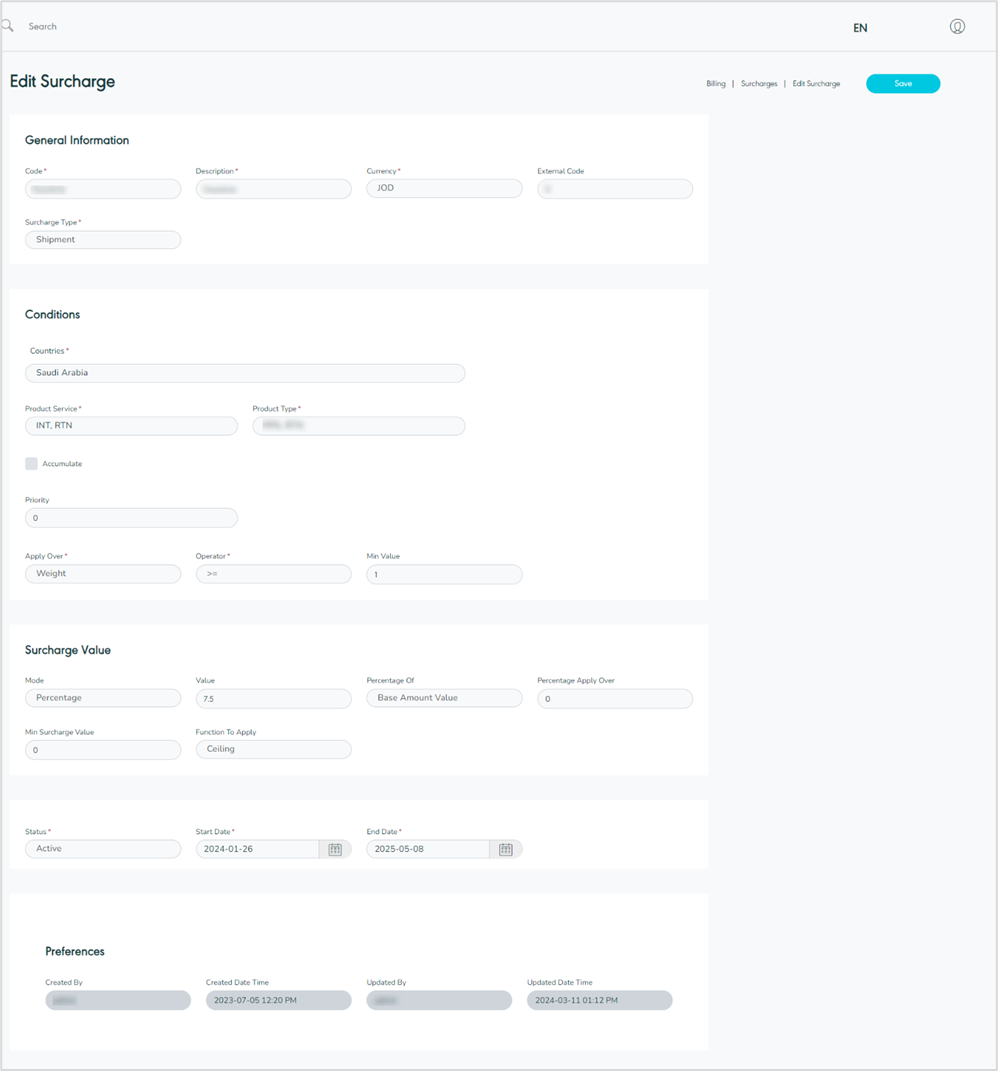
By clicking on Save, the system updates the surcharges successfully.
3. Additional Charges Management
The purpose of this feature is to define and manage the additional charges along with their associated configurations. Additional charges are linked to Product service, Product type as well as Service code, example is COD additional charge.
3.1 View Additional Charges
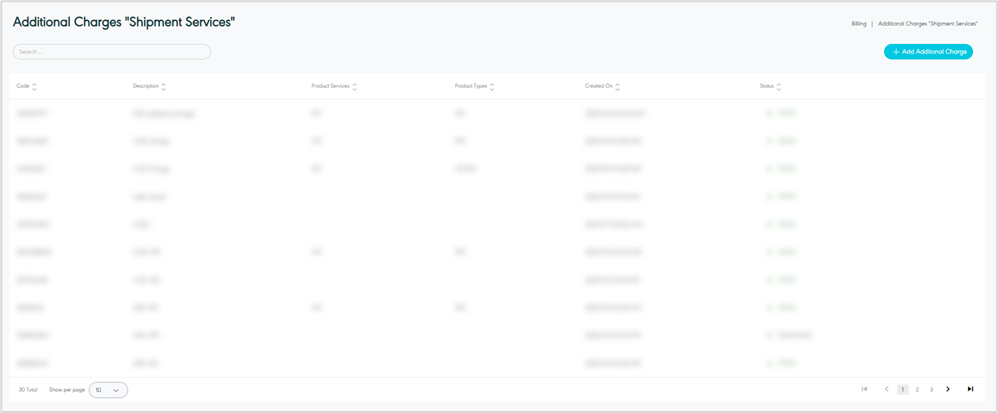
The user can view the defined additional charges in the system by navigating to the ‘Additional Charges’ screen by choosing the Billing Module from the left navigation panel as follows:
-
Search: the user can search for the additional charges by typing in the search filter field.
-
Show Per Page: the user can select the number of items to show on each page.
-
Add Additional Charges: the user can add a new additional charge by clicking on Add Additional Charge, referring to the Add Additional Charge section.
-
Actions: by clicking on this button the user can view specific additional charge details by referring to View Additional Charge Details and edit additional charge by referring to Edit Additional Charge as follows:
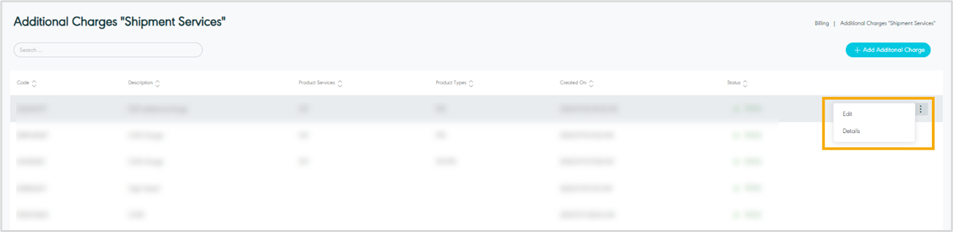
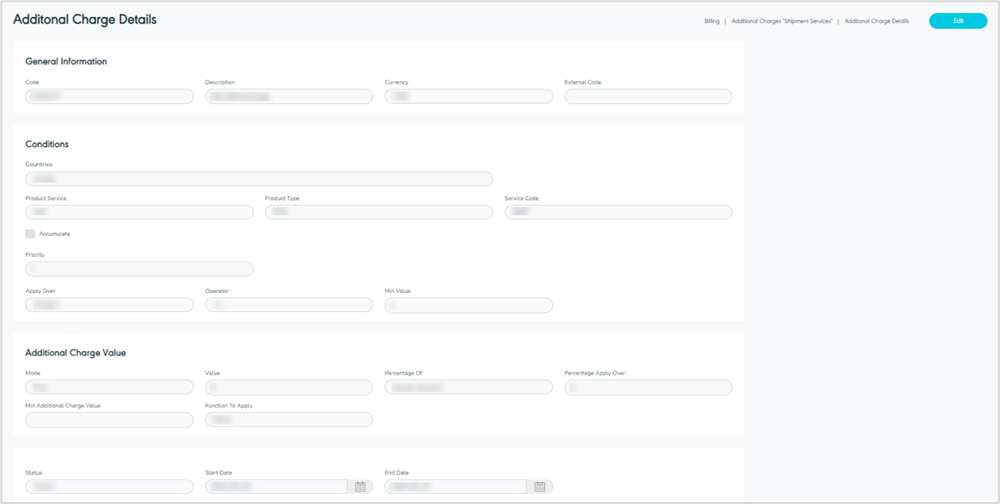
3.2 View Additional Charge Details
The user can view the details of the additional charges by navigating to the ‘Additional Charges’ screen via the Billing Module and clicking on Details from Actions as follows:
3.3 Add New Additional Charge
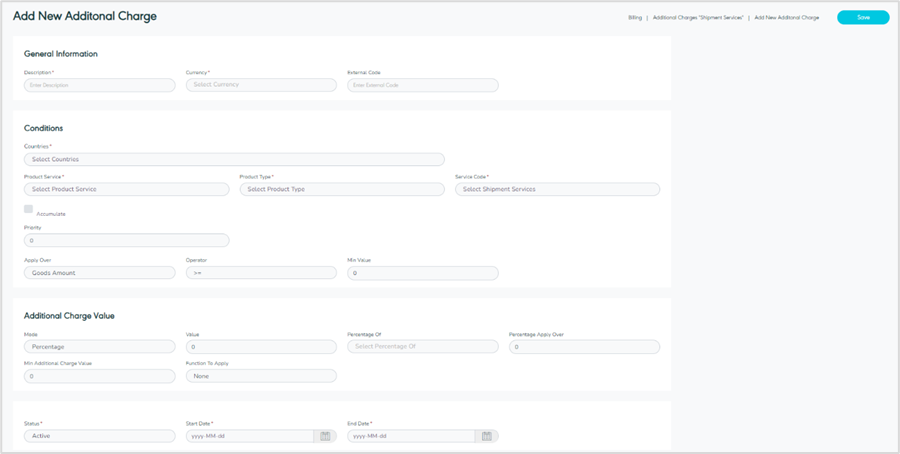
The user can add new additional charges by navigating to the ‘Additional Charges’ screen via Billing Module and clicking on Add Additional Charge as follow:
-
Description: this field represents the description of the additional charges.
-
Currency: this field represents the additional charges’ currency.
-
External Code: this field represents the customer service ID for integration purposes.
-
Countries: This field represents the countries to which the additional charges will be applied.
-
Product Service: this field represents the product service surcharges: International or Domestic.
-
Product Type: this field represents the delivery type of product service. e.g.: DLV: Home Delivery, PUD: Office Drop off, or PSD: Parcel Station Drop off.
-
Service Code: this field represents the code of any additional service.
-
Accumulate: by marking this option, the system will consider any other related charges when calculating the additional charges.
-
Priority: If there are multiple additional charges defined on shipment level, then the execution of those charges will be according to the priority defined.
-
Apply Over: this field represents the criteria for which the additional charges will apply e.g., Goods Value, Weight, COD Value, and Base Amount Value.
-
Operator: this field represents mathematical symbols e.g., <,>, =, <=,>= etc....
-
Min Value: this field represents the minimum allowed value for applying for additional charge.
-
Mode: this field represents the methods of calculating the additional charges e.g.: Percentage or Flat rate.
-
Value: this field represents the value to apply on the selected mode.
-
Percentage of: this field represents the percentage ratio that applies to the additional charges.
-
Percentage Apply Over: this field represents the additional charges’ minimum value for the percentage mode.
-
Min Additional Value: this field represents the additional values’ minimum amount.
-
Function To Apply: this field represents the rounding type.
-
Status: this field represents the status where active means that the additional charges are currently functioning with SPL and inactive means that those charges are no longer active in the SPL system
-
Start Date: this field represents the start date for enabling the additional charges.
-
End Date: this field represents the end date of disabling the additional charges.
By clicking on Save, the system adds new additional charges successfully.
3.4 Edit Additional Charge
The user can edit the additional charges information by clicking on Edit from Actions, by navigating to the ‘Additional Charges’ screen via the Billing Module as follows:
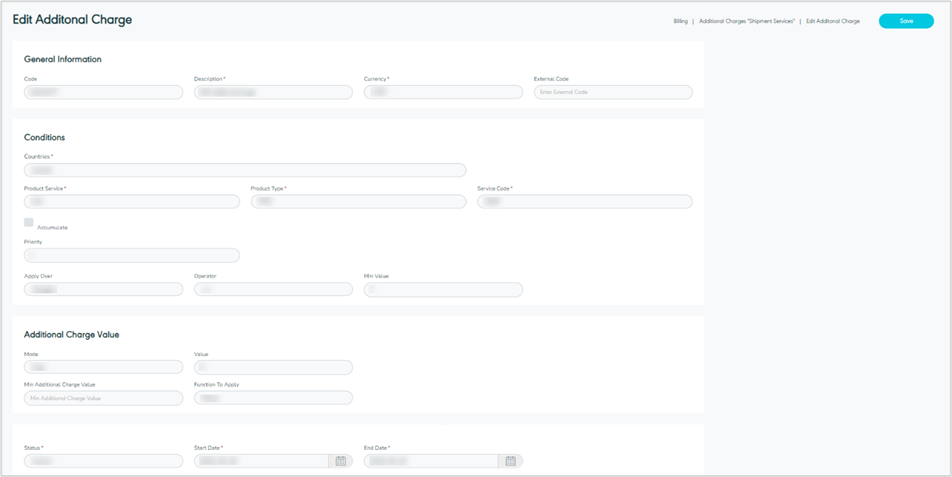
By clicking on Save, the system updates the additional charges successfully.
4. Discount Management
The purpose of this feature is to define and manage the discounts along with their associated configurations. Discounts are linked to Product service, Product type as well as the Service code and can be applied on either shipments or invoices.
4.1 View Discount
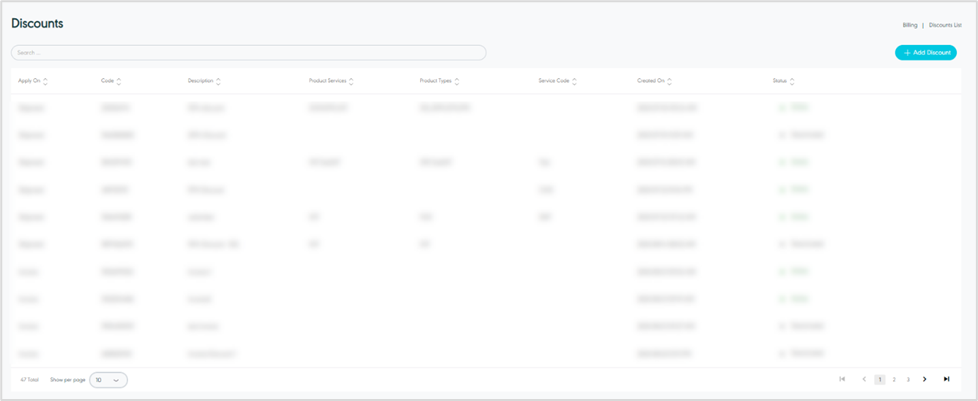
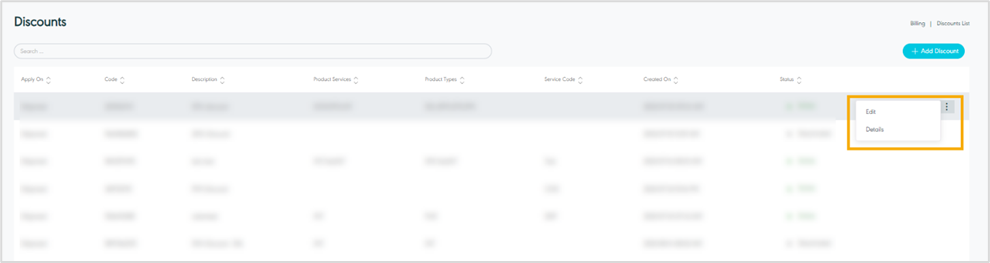
The user can view the defined discount in the system by navigating to the ‘Discount’ screen via the Billing Module from the left navigation panel as follows:
-
Search: the user can search for the discount by typing in the search filter field.
-
Show Per Page: the user can select the number of items to show on each page.
-
Add Discount: the user can add a new discount by clicking on Add Discount, referring to the Add New Discount section.
-
Actions: by clicking on this button, the user can view specific discount details by referring to View Discount Details and edit discount by referring to Edit Discount as follows:
4.2 View Discount Details
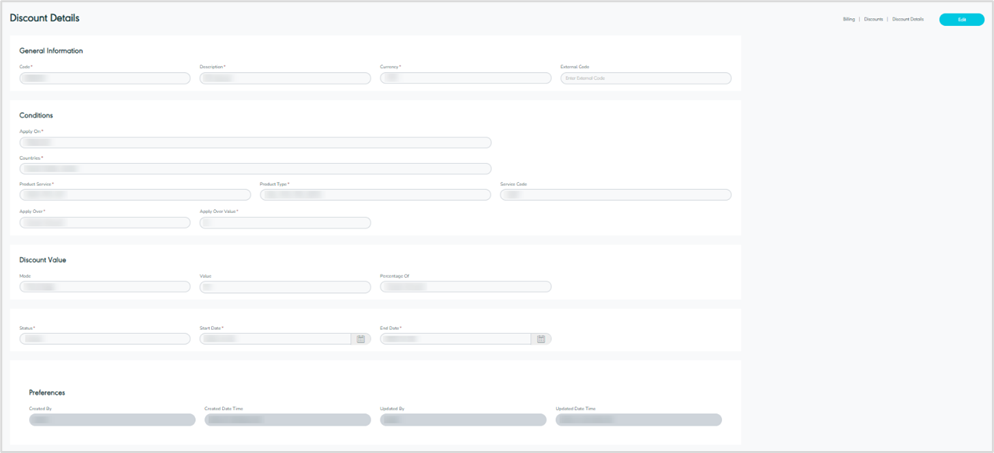
The user can view the details of the discount by navigating to the ‘Discount’ screen via the Billing Module and clicking on Details from Actions as follows:
4.3 Add New Discount
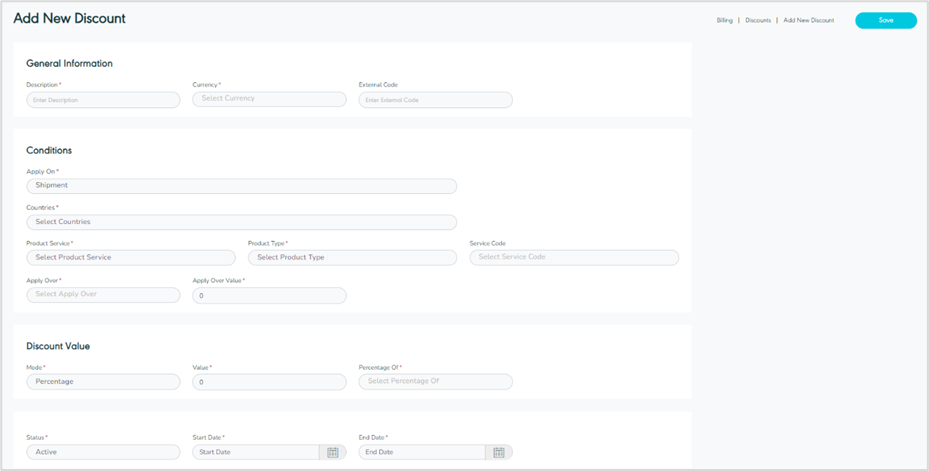
The user can add a new discount by navigating to the ‘Discount’ screen via Billing Module and clicking on Add New Discount as follows:
-
Description: this field represents the discount’s description.
-
Currency: this field represents the discount’s currency.
-
Apply On: this field represents the discount applicable on (shipment or invoice)
-
Countries: This field represents the countries to which the discount will be applied.
-
Product Service: this field represents the product service of the discount: International or Domestic.
-
Product Type: this field represents the discount product service. e.g.: DLV: Home Delivery, PUD: Office Drop off, or PSD: Parcel Station Drop off.
-
Service Code: this field represents the code of any additional service.
-
Apply Over: this field represents the criteria for which the discount will apply e.g., Goods Value, Weight, COD Value, and Base Amount Value.
-
Apply Over Value: this field represents the minimum value that will be applied to the discount.
-
Mode: this field represents the methods of calculating the discount e.g.: Percentage or Flat rate.
-
Value: this field represents the value to apply on the selected mode.
-
Percentage of: this field represents the percentage ratio that applies to the discount.
-
Status: this field represents the status where active means that the discount is currently functioning with SPL and inactive means that the discount is no longer active in the SPL system.
-
Start Date: this field represents the start date of enabling the discount.
-
End Date: this field represents the end date of disabling the discount.
By clicking on Save, the system adds a new discount successfully.
4.4 Edit Discount
The user can edit the discount information by navigating to the ‘Discount’ screen via the Billing Module and clicking on Edit from Actions, as follows:
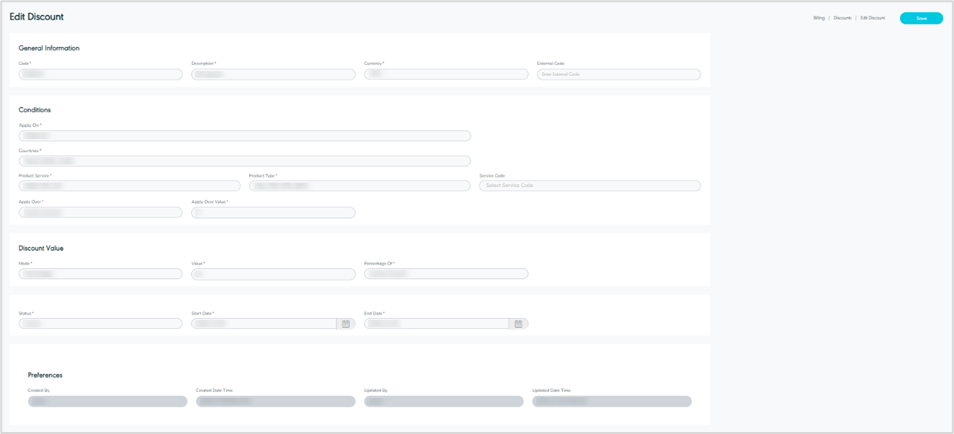
By clicking on Save, the system updates the discount successfully.
5. Shipping Charges Management
The purpose of this feature is to manage the shipping charges, where users can view the shipping charges and edit them for recalculation when necessary.
5.1 View Shipping Charges
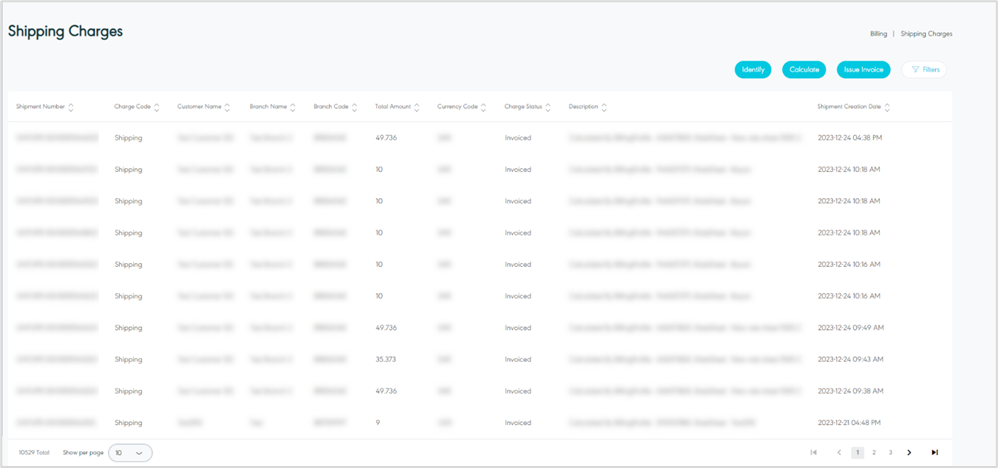
The user can view the defined shipping charges in the system by choosing the Billing Module from the left navigation panel and navigating to the ‘Shipping Charges’ screen as follows:
-
Filter: the user can search for the shipping charges by typing the shipment number (AWB), customer code, and branch code in the search filter field.
-
Identify: this button enables the user to re-calculate the shipping charges.
-
Calculation: this button enables the user to calculate the shipping charges manually.
-
Issue Invoice: this button enables the user to create the shipping charges invoice manually.
-
Show Per Page: the user can select the number of items to show on each page.
-
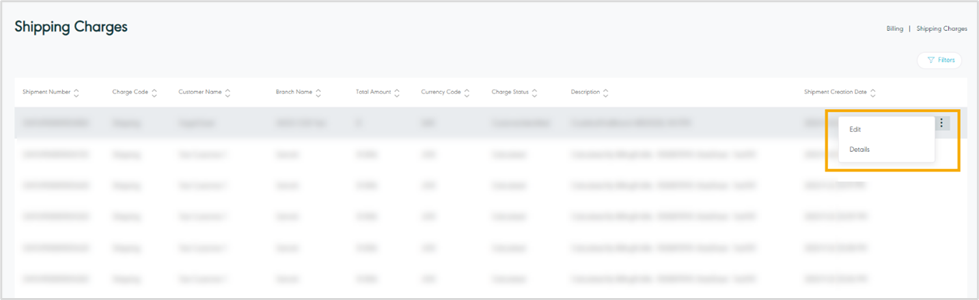
Actions: by clicking on this button, the user can view specific shipping charges details by referring to View Shipping Charges Details, and edit shipping charges by referring to Edit Shipping Charges as follows:
5.2 View Shipping Charges Details
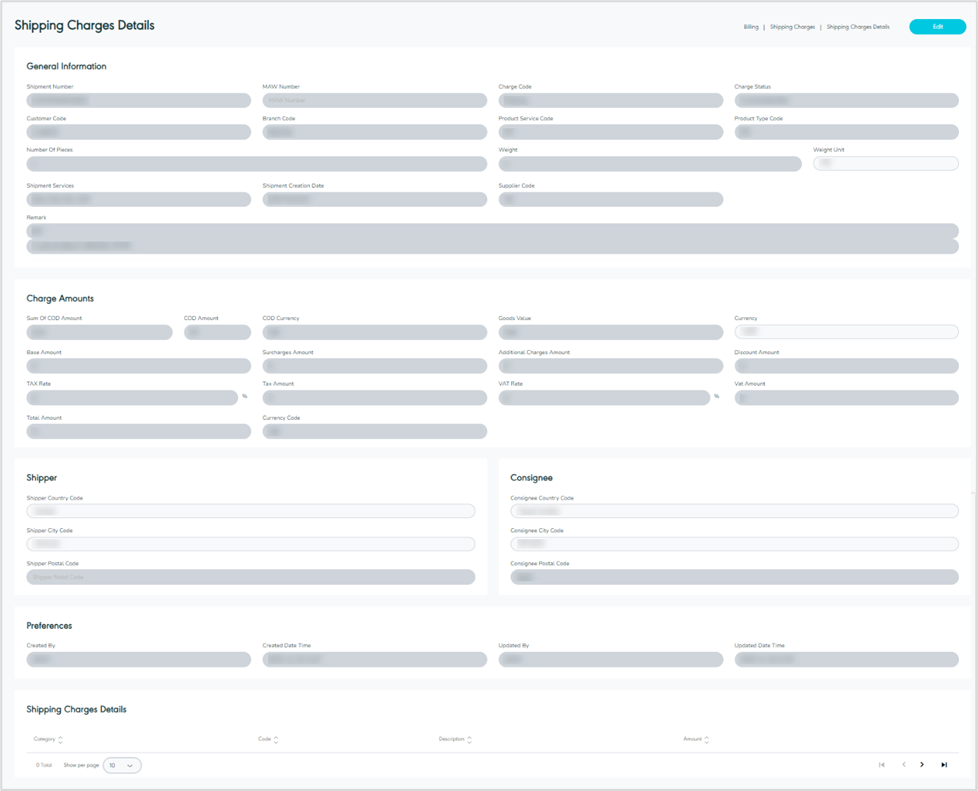
The user can view the details of the shipping charges by navigating to the ‘Shipping Charges’ screen via the Billing Module and clicking on Details from Actions as follows:
-
Edit: the user can edit the information on the shipping charges by clicking on the Edit button by referring to the Edit Shipping Charges section.
5.3 Edit Shipping Charges
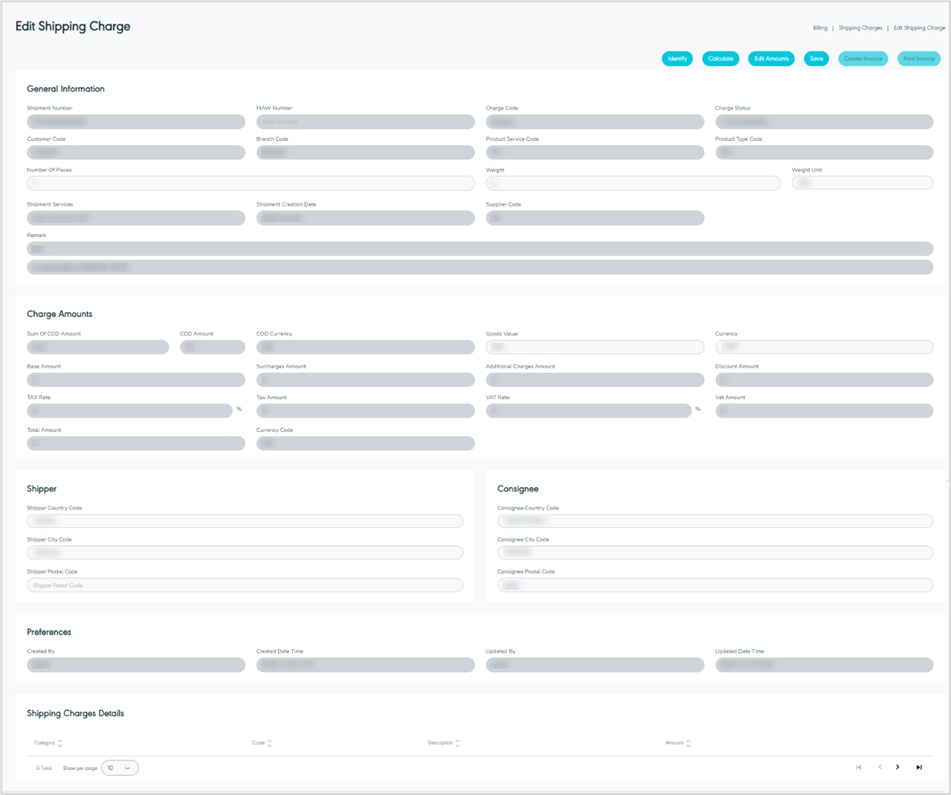
The user can edit the information on the shipping charges by navigating to the ‘Shipping Charges’ screen via the Billing Module and clicking on Edit from Actions, as follows:
-
Identify: this button enables the user to re-calculate the shipping charges.
-
Calculate: this button enables the user to calculate the shipping charges manually.
-
Edit Amounts: this button enables the user to update base amount, surcharges, & additional charges manually.
-
Save: this button enables the user to save the changes made.
-
Create Invoice: this button enables the user to create the shipping charges invoice.
-
Print Invoice: this button enables the user to print the shipping charges invoice.
6. Customs Charges Management
The purpose of this feature is to manage the customs charges, where users can view the customs charges and edit them for recalculation if necessary.
6.1 View Customs Charges
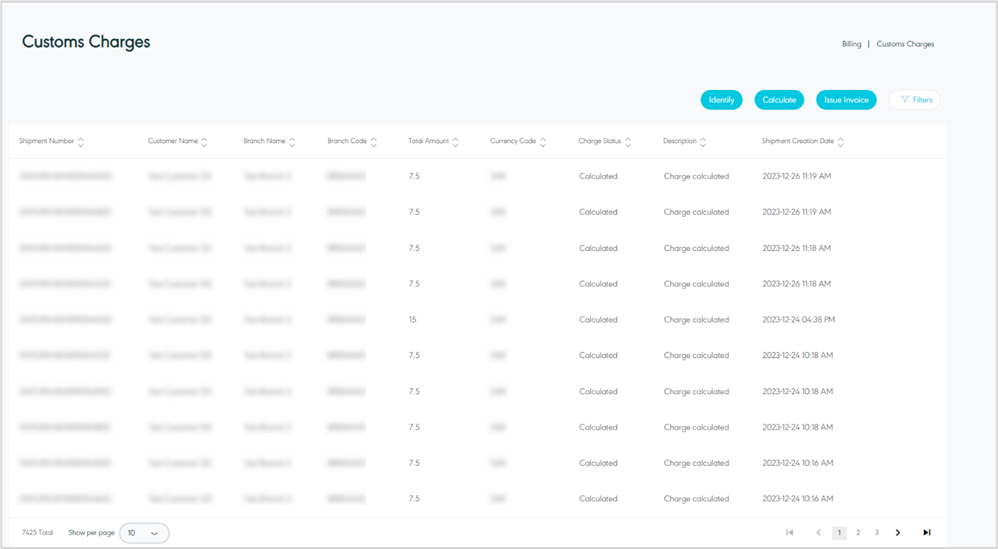
The user can view the defined customs charges in the system by choosing the Billing Module from the left navigation panel and navigating to the ‘Customs Charges’ screen as follows:
-
Filter: the user can search for the customs charges by typing the shipment number (AWB), customer code, branch code, product type and charge status in the search filter field.
-
Identify: this button enables the user to re-calculate the shipping charges.
-
Calculate: this button enables the user to calculate the shipping charges manually.
-
Issue Invoice: this button enables the user to create the shipping charges invoice manually.
-
Show Per Page: the user can select the number of items to show on each page.
-
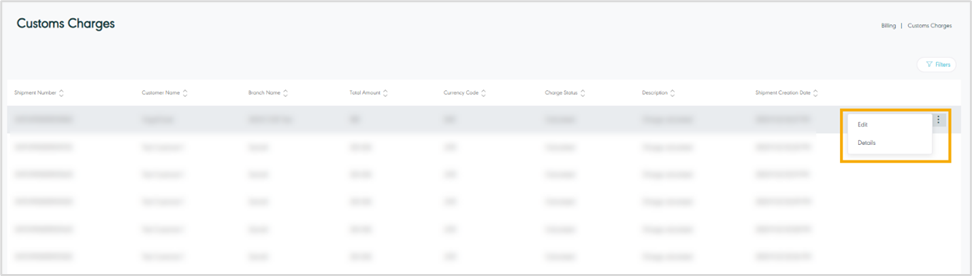
Actions: by clicking on this button, the user can view specific shipping charges details by referring to View Customs Charges, and edit shipping charges by referring to Edit Customs Charges as follows:
6.2 View Customs Charges Details
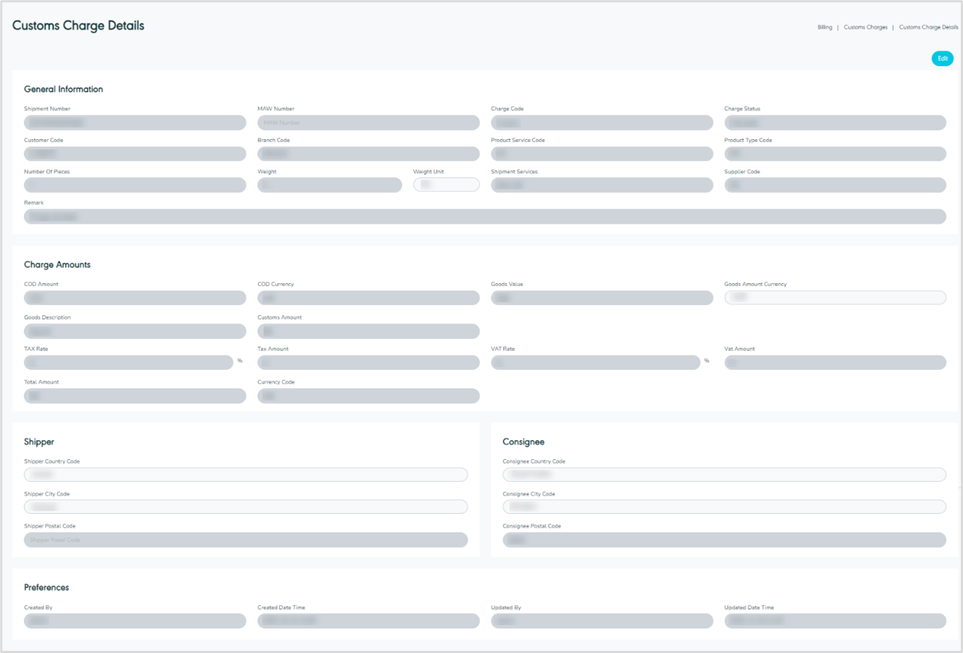
The user can view the details of the customs charges by navigating to the ‘Customs Charges’ screen via the Billing Module and clicking on Details from Actions, as follows:
-
Edit: the user can edit the information on the customs charges by clicking on the Edit button by referring to the Edit Customs Charges section.
6.3 Edit Customs Charges
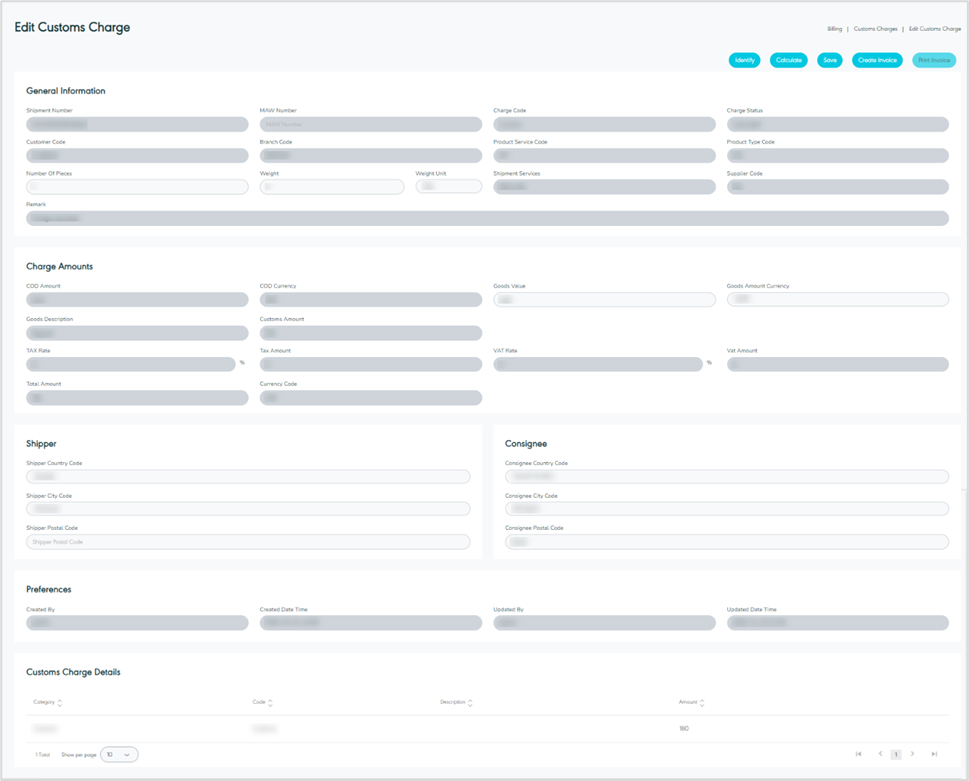
The user can edit the information on the customs charges by navigating to the ‘Customs Charges’ screen via the Billing Module and clicking on Edit from Actions, as follows:
-
Identify: this button enables the user to re-calculate the customs charges.
-
Calculate: this button enables the user to calculate the customs charges manually.
-
Save: this button enables the user to save the changes made.
-
Create Invoice: this button enables the user to create the customs charges invoice.
-
Print Invoice: this button enables the user to print the customs charges invoice.
7. Shipping Charges Invoices
The purpose of this feature is to allow the user to view the related shipping charges invoices, where the user can search for a specific invoice using Filters.
The user can view the defined shipping charges invoices in the System by choosing the Billing Module from the left navigation panel and navigating to the ‘Shipping Charges Invoices’ screen as follows:
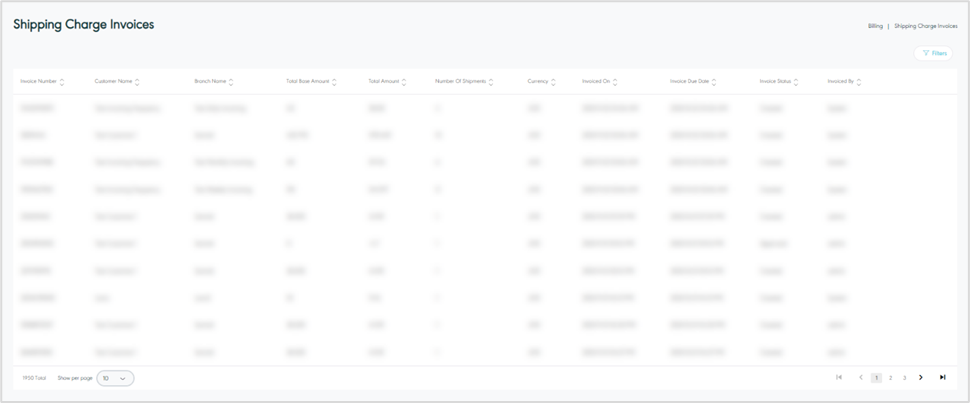
-
Filters: the user can search for the shipping charges by typing the Billing date, Customer code, Branch code, and invoice number on the search filter fields.
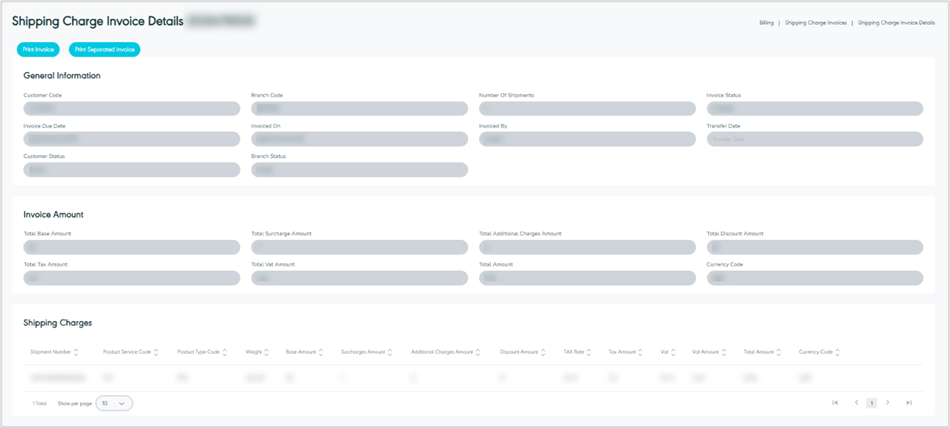
7.1 View Shipping charges invoice Details
The user can view more details by clicking on Actions, then Details as follows:
8. Customs Charges Invoices
The purpose of this feature is to allow the user to view the related customs charges invoices, where the user can search for a specific invoice using Filters.
The user can view the defined customs charges invoices in the System by choosing the Billing Module from the left navigation panel and navigating to the ‘Customs Charges Invoices’ screen as follows:
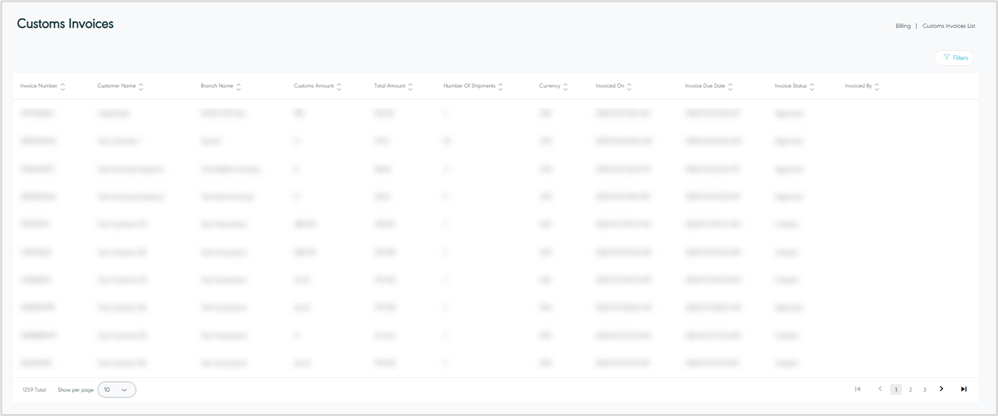
-
Filters: the user can search for the customs charges by typing the Billing date, Customer code, Branch code, and invoice number on the search filter fields.
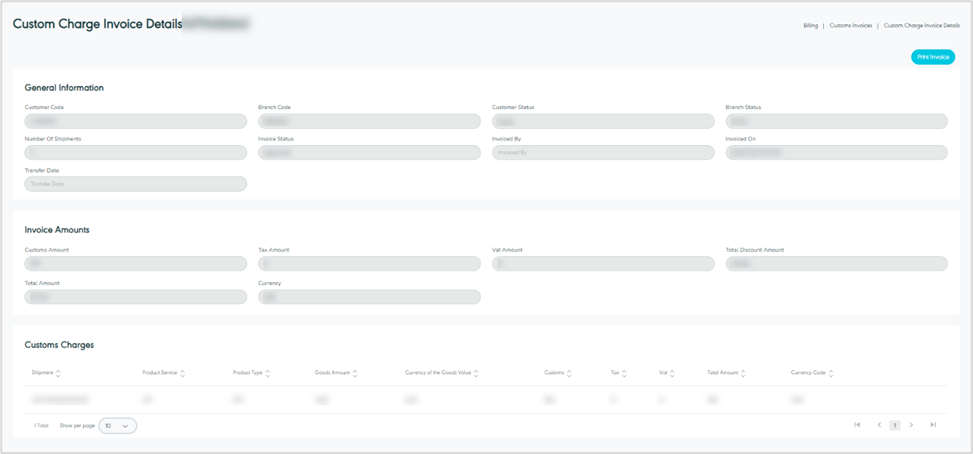
8.1 View Customs Invoice Details
The user can view more details by clicking on Actions, then Details as follows:
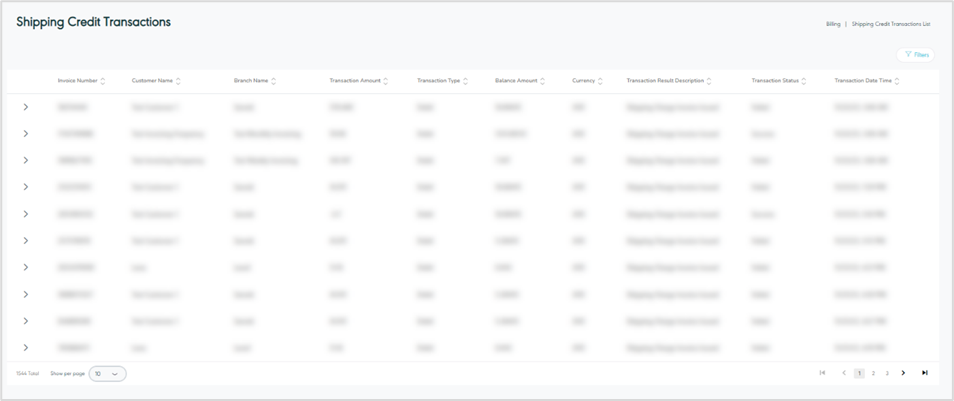
9. Shipping Credit Transaction
This feature provides an overview of the shipping credit transactions details including transactions, balance amounts, currency, and payment status. The user has the capability to filter per customer code, branch code and status for a specified period.
The user can view the Shipping credit transaction in the System by navigating to the ‘Shipping Credit Transaction’ screen via the Billing Module from the left navigation panel as follows:
10. Custom Credit Transaction
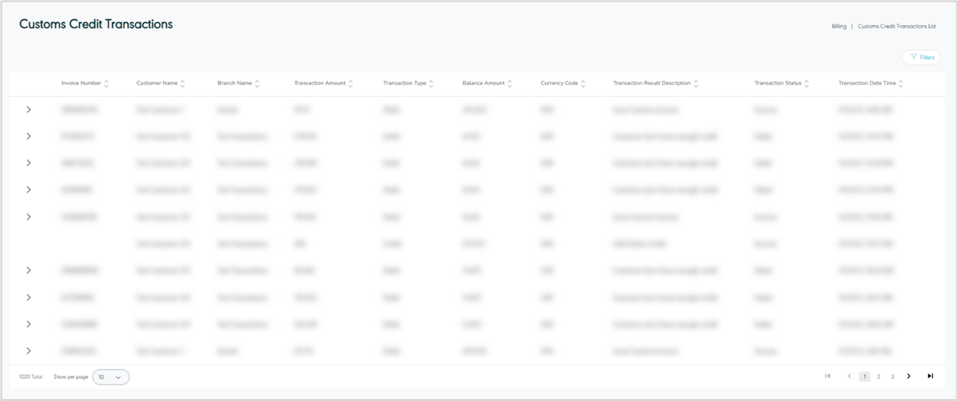
This feature provides an overview of the customs credit transaction details including transactions, balance amounts, currency, and payment status. The user has the capability to filter per customer code, branch code, and status for a specified period.
The user can view the defined custom credit transaction in the System by navigating to the ‘Custom Credit Transaction’ screen via the Billing Module from the left navigation panel as follows:
11. COD Shipment
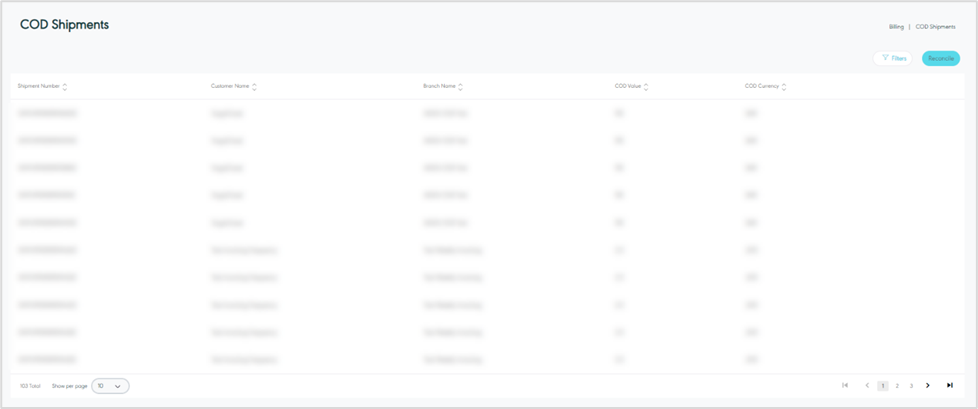
The purpose of this feature is to provide the user with an overview of COD shipments with their COD values and currencies that will be used for reconciliation.
The user can view the defined COD shipment in the System by navigating to the ‘COD Shipment’ screen by choosing the Billing Module from the left navigation panel as follows:
-
Reconcile: the user can reconcile a batch of shipments by clicking on the Reconcile button.
-
Actions: by clicking on this button the user can reconcile specific shipments.
-
Show Per Page: the user can select the number of items to show on each page.
-
Filter: the user can search for the COD shipments by typing the customer’s name, branch name and Date in the search filter field.
12. COD Batch Reconciliation
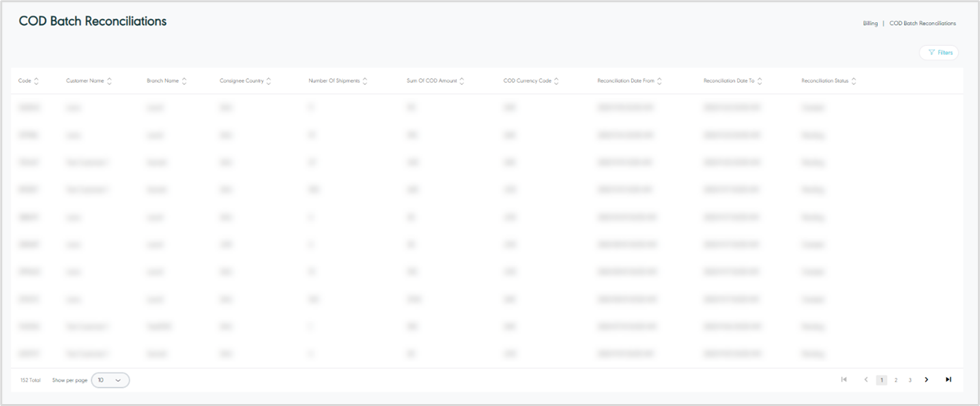
The purpose of this feature is to provide the user with an overview of COD shipments with their COD values, currencies as batches, for approval and transfer.
The user can view the defined COD batch reconciliation in the System by navigating to the ‘COD Batch Reconciliation’ screen via the Billing Module from the left navigation panel as follows:
-
Filters: the user can search for the COD shipments by typing the customer’s name, branch name and reconciliation status in the search filter fields.
-
Approve: The user confirms that the COD amounts are approved and ready to be transferred.
-
Transfer: The user confirms that the COD reconciliation and transfer has been done.
-
Actions: By clicking on action button, the user can approve and transfer the COD amounts after the reconciliation has been done.
-
Show Per Page: the user can select the number of items to show on each page.
13. Chargeable Weight Rule
The purpose of this feature is to manage the shipment that are being billed according to the ratesheets based on its calculated chargeable weight. The chargeable weight should be configured at the branch level, as it can be tailored for each customer's contract. Each customer will have a different logic to follow when determining the chargeable weight.
This field controls the value for how the chargeable weight for shipments at branch is calculated. It can either be selected from a list of weight types or follow the volumetric equation. The new logic for "Charge Weight By" will affect the "Chargeable Weight" as follows:
13.1 Billing Settings- Charge Weight By
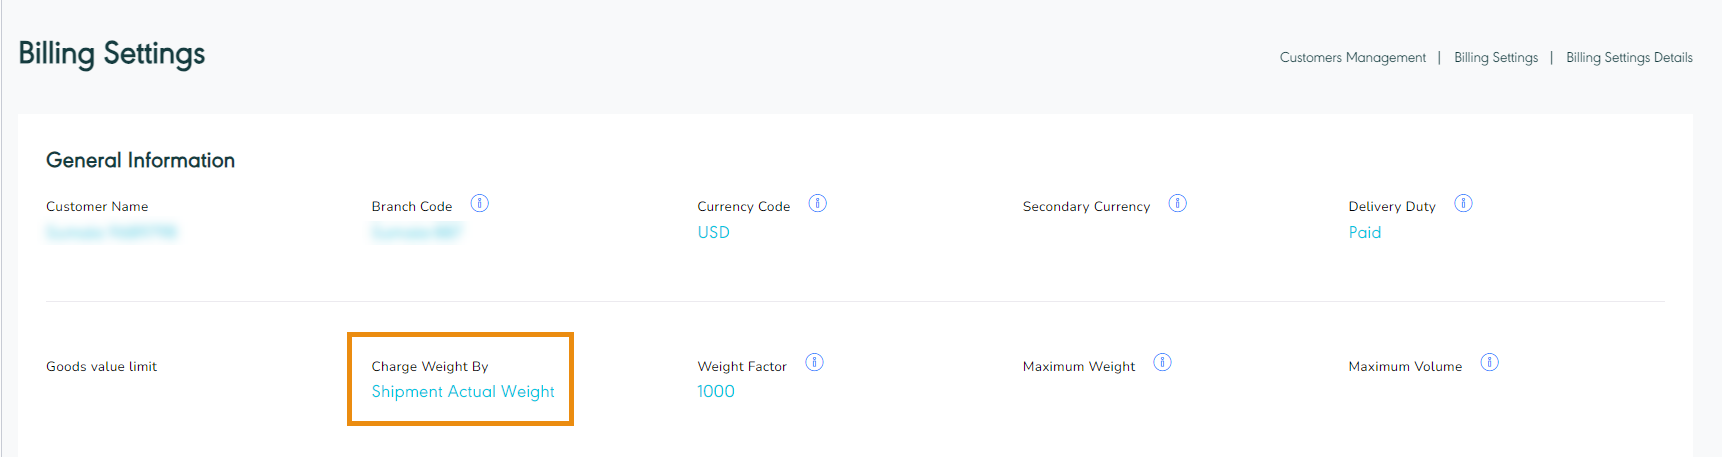
1- "Charge Weight By" is defined on the branch level under the billing settings .
2- “Chargeable Weight Rule” can be any of the following: Actual Weight, Airline Weight, Chargeable Weight, Last Mile Weight, Retailer Weight and Shipper Weight, which is managed in “Chargeable Weight Rules Management“
3- The expected behavior of 'Chargeable Weight Rule' list selection is the following:
3.1 If the actual weight is selected, the chargeable weight value will be the actual weight for these branch shipments.
3.2 If the volumetric weight is selected, the chargeable weight value will be the volumetric weight for these branch shipments, if the customize weight is selected; the chargeable weight value is this customized weight.. etc.
4- On each actual weight or volumetric weight update; the chargeable weight logic will be re-calculated based on this change and passed to the billing system for re-calculation.
13.2 Chargeable Weight Rules Management
13.2.1 View Chargeable Weight Rule
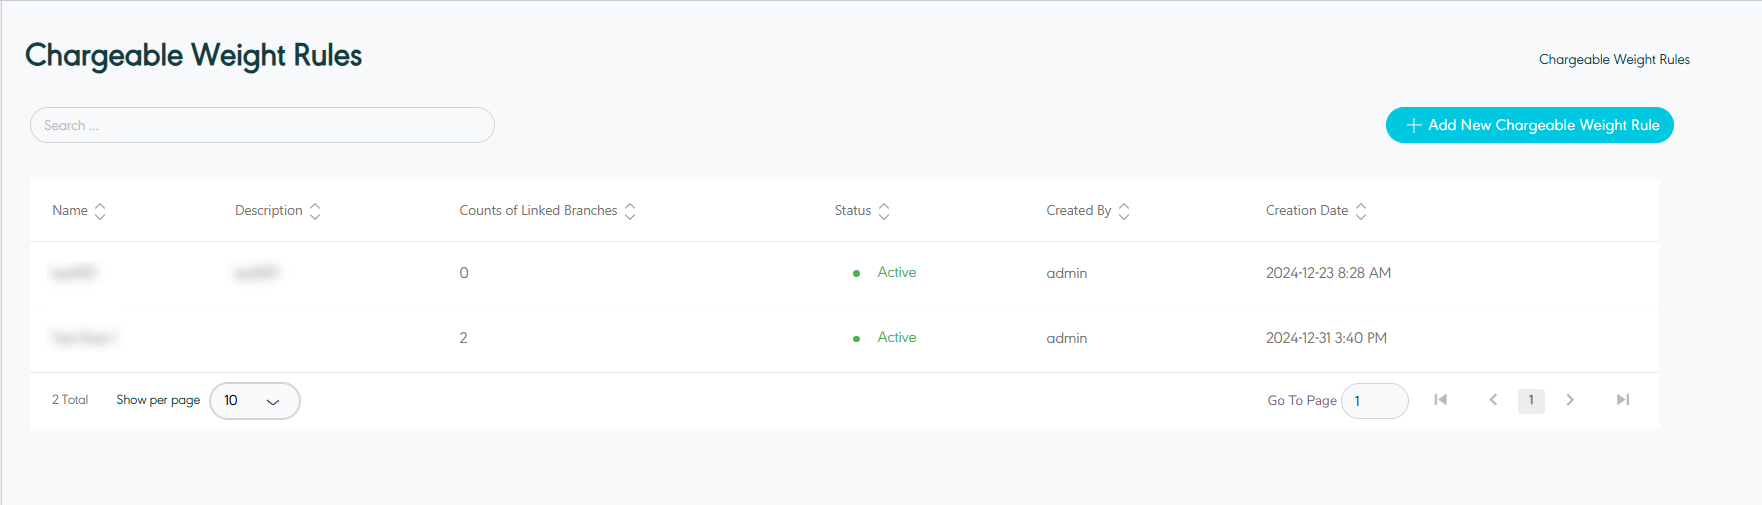
The user can view the defined chargeable weight rule in the system by navigating to the ‘Chargeable Weight Rule’ screen via Billing Module as follows:
-
Add New Chargeable Weight Rule: the user can add a new chargeable weight rule by clicking on Add New Chargeable Weight Rule, referring to the Add New Chargeable Weight Rule section
-
Search: the user can search for the chargeable weight rules by using the search filter field.
-
Show Per Page: the user can select the number of items to show on each page.
-
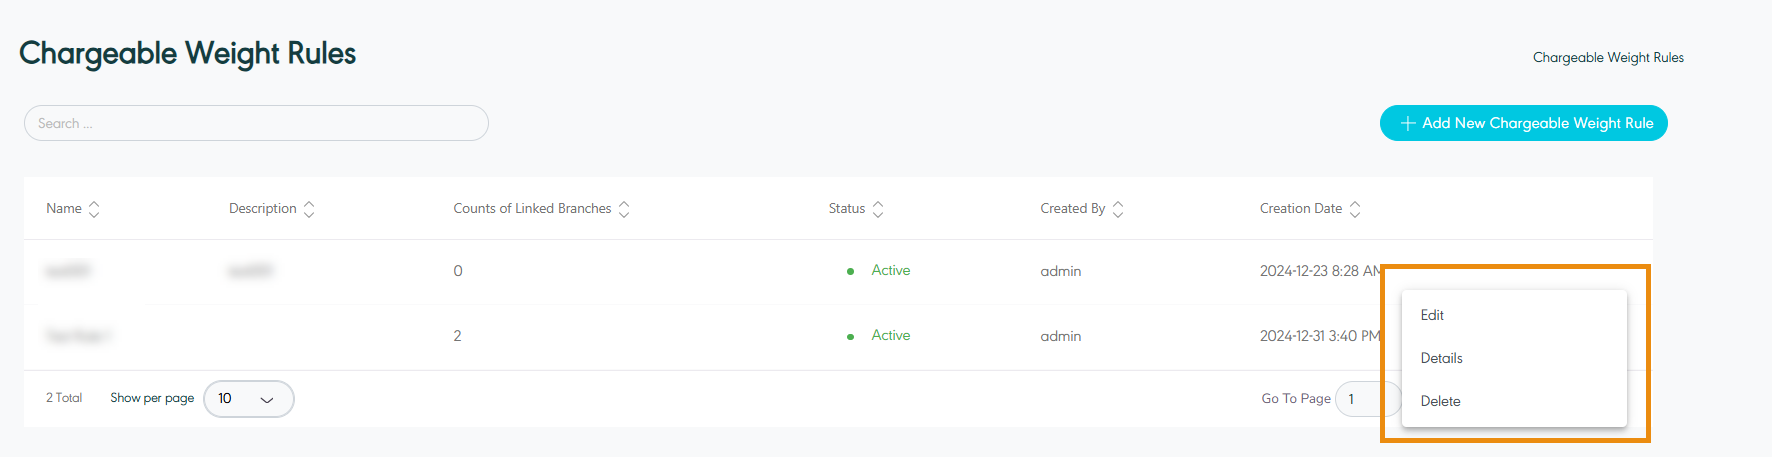
Actions: by clicking on this button the user can view specific chargeable weight rule details by referring to View Chargeable Weight Rule Details and edit chargeable weight rule by referring to Edit Chargeable Weight Rule, and Delete Chargeable Weight Rule as follows:
13.2.2 View Chargeable Weight Rule Details
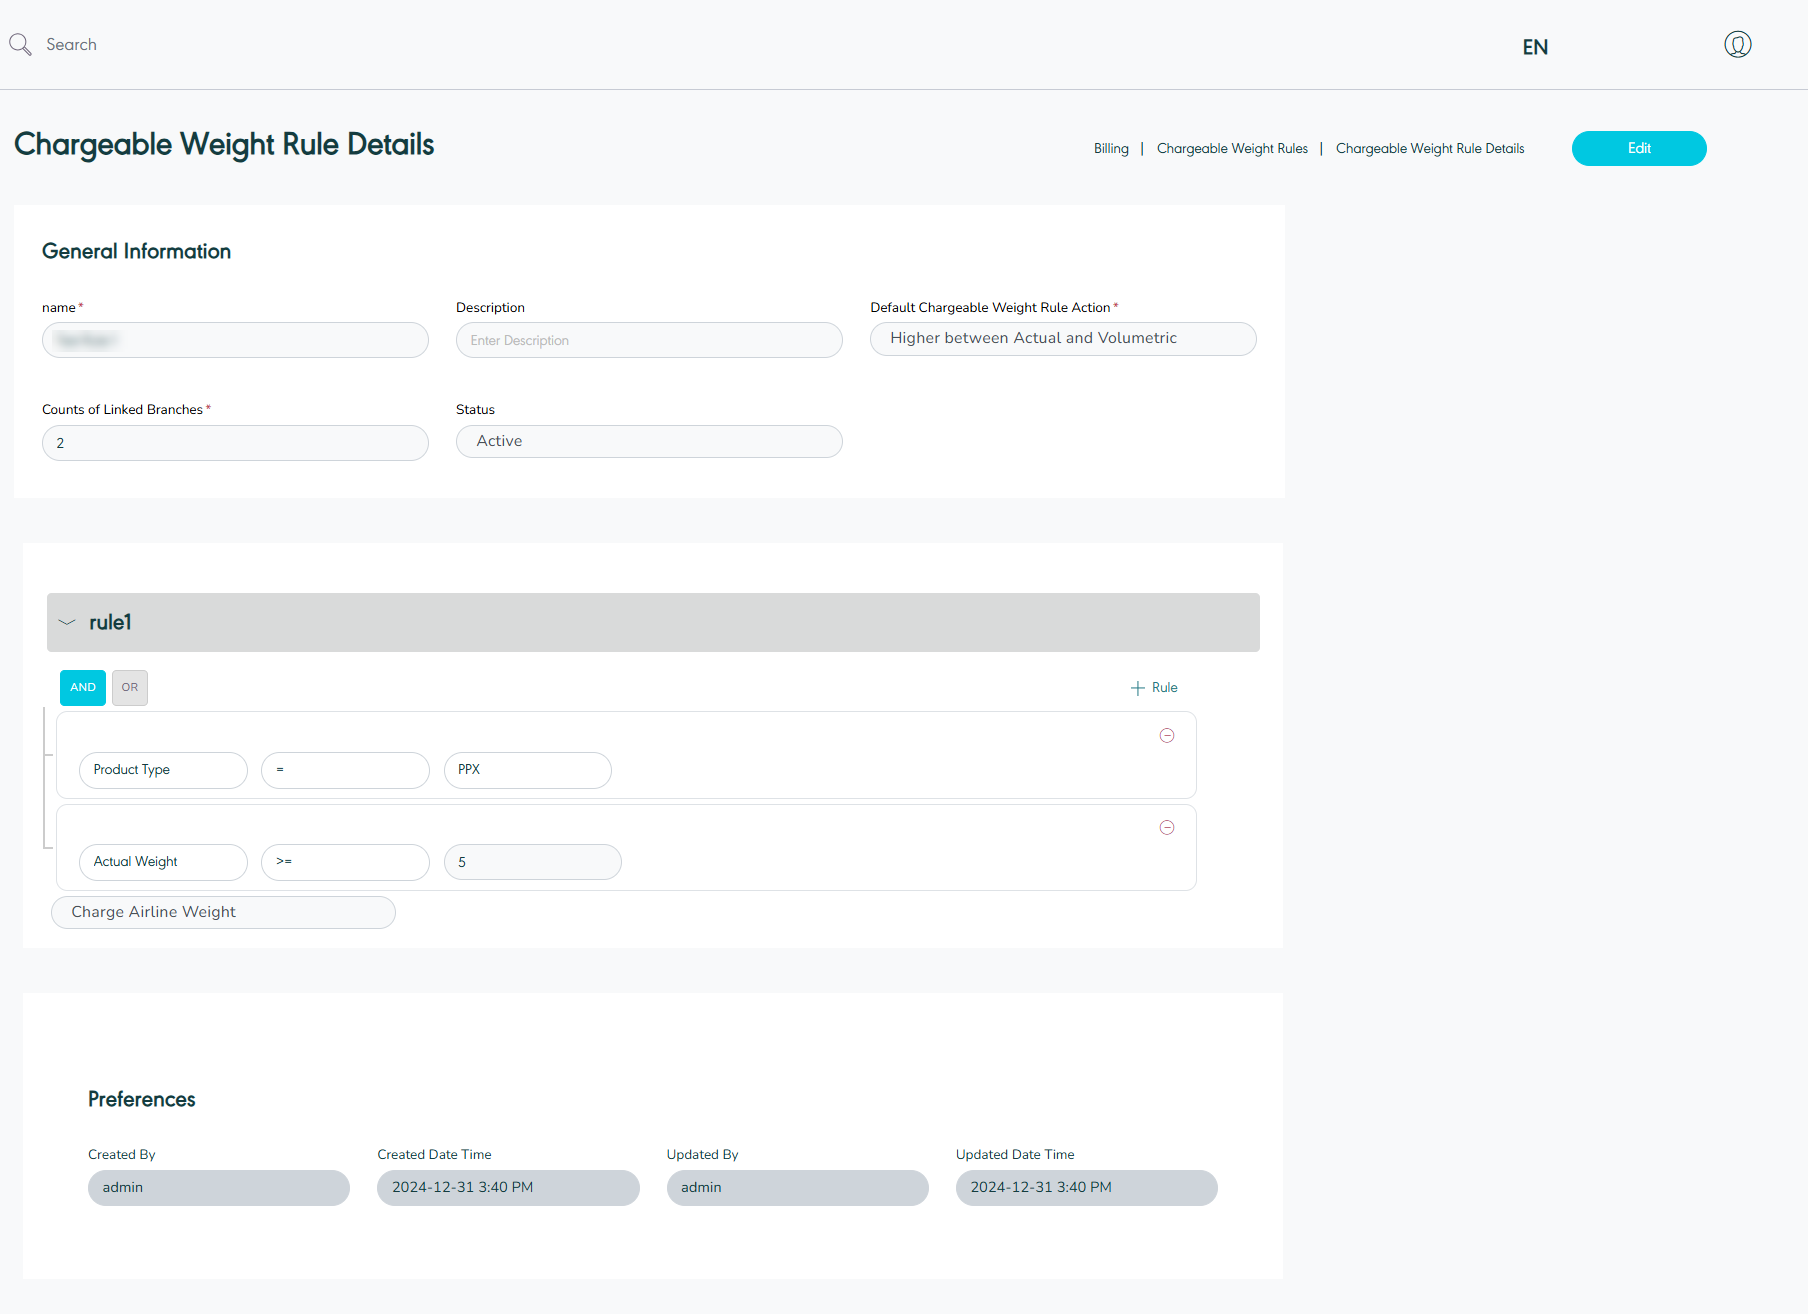
The user can view the chargeable weight rule details by navigating to the ‘Chargeable Weight Rule’ screen via the Billing Module and clicking on Details from Actions as follows:
13.2.3 Add Chargeable Weight Rule
The user can add a new chargeable weight rule by navigating to the ‘Chargeable Weight Rule’ screen via Billing Module and clicking on Chargeable Weight Rule as follows:
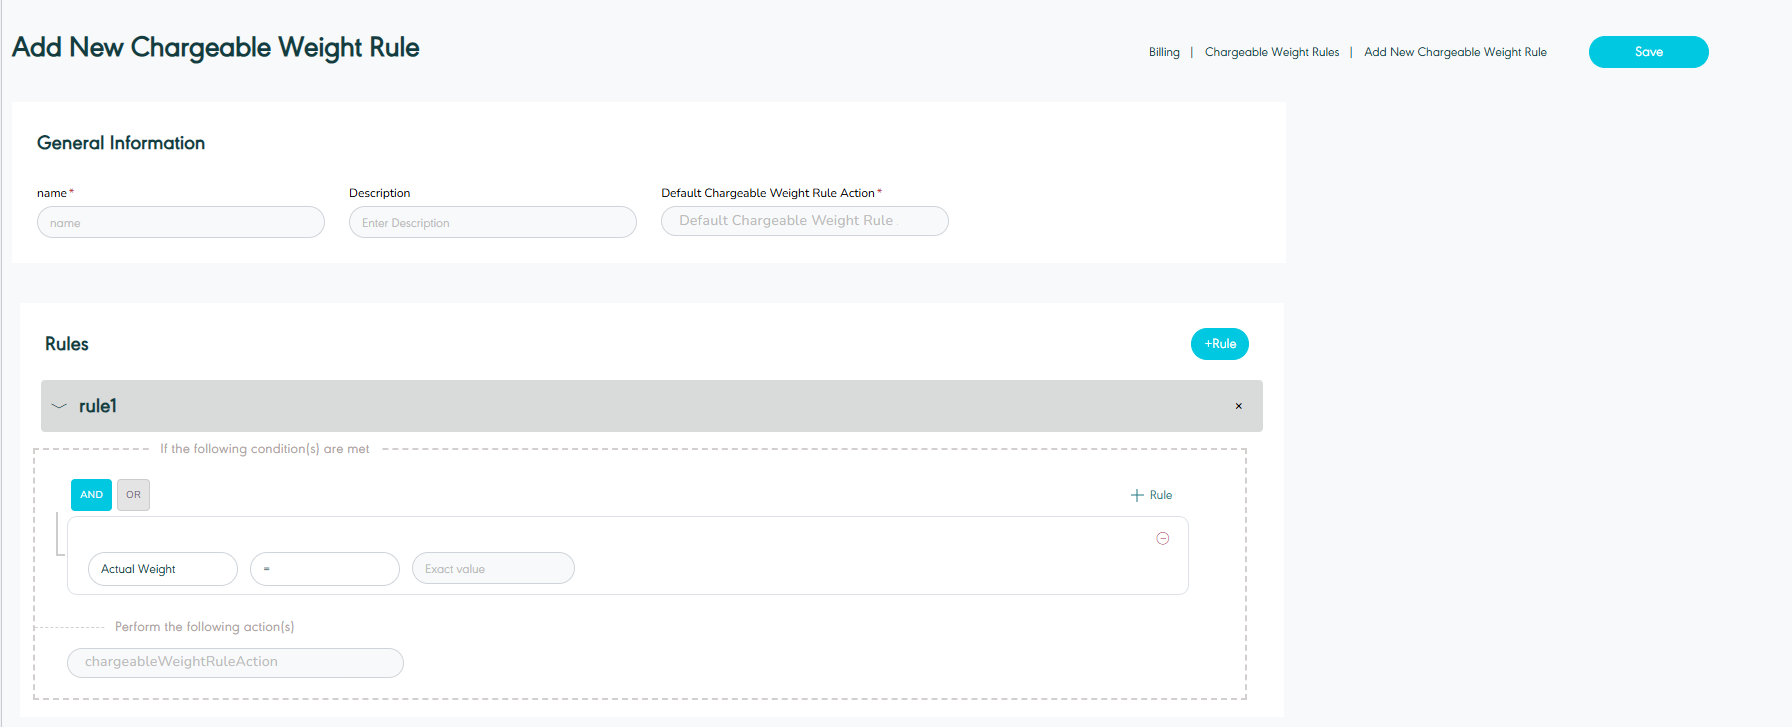
-
Name: this field represents the name’s rule.
-
Description: this field represents the descriptions of rules.
-
Default Chargeable Weight Rule Action: this field represents the list of actions.
13.2.4 Edit Chargeable Weight Rule
The user can edit existing chargeable weight rule by clicking on Edit from Actions by navigating to the ‘Chargeable Weight Rule’ screen via the Billing Module as follows:
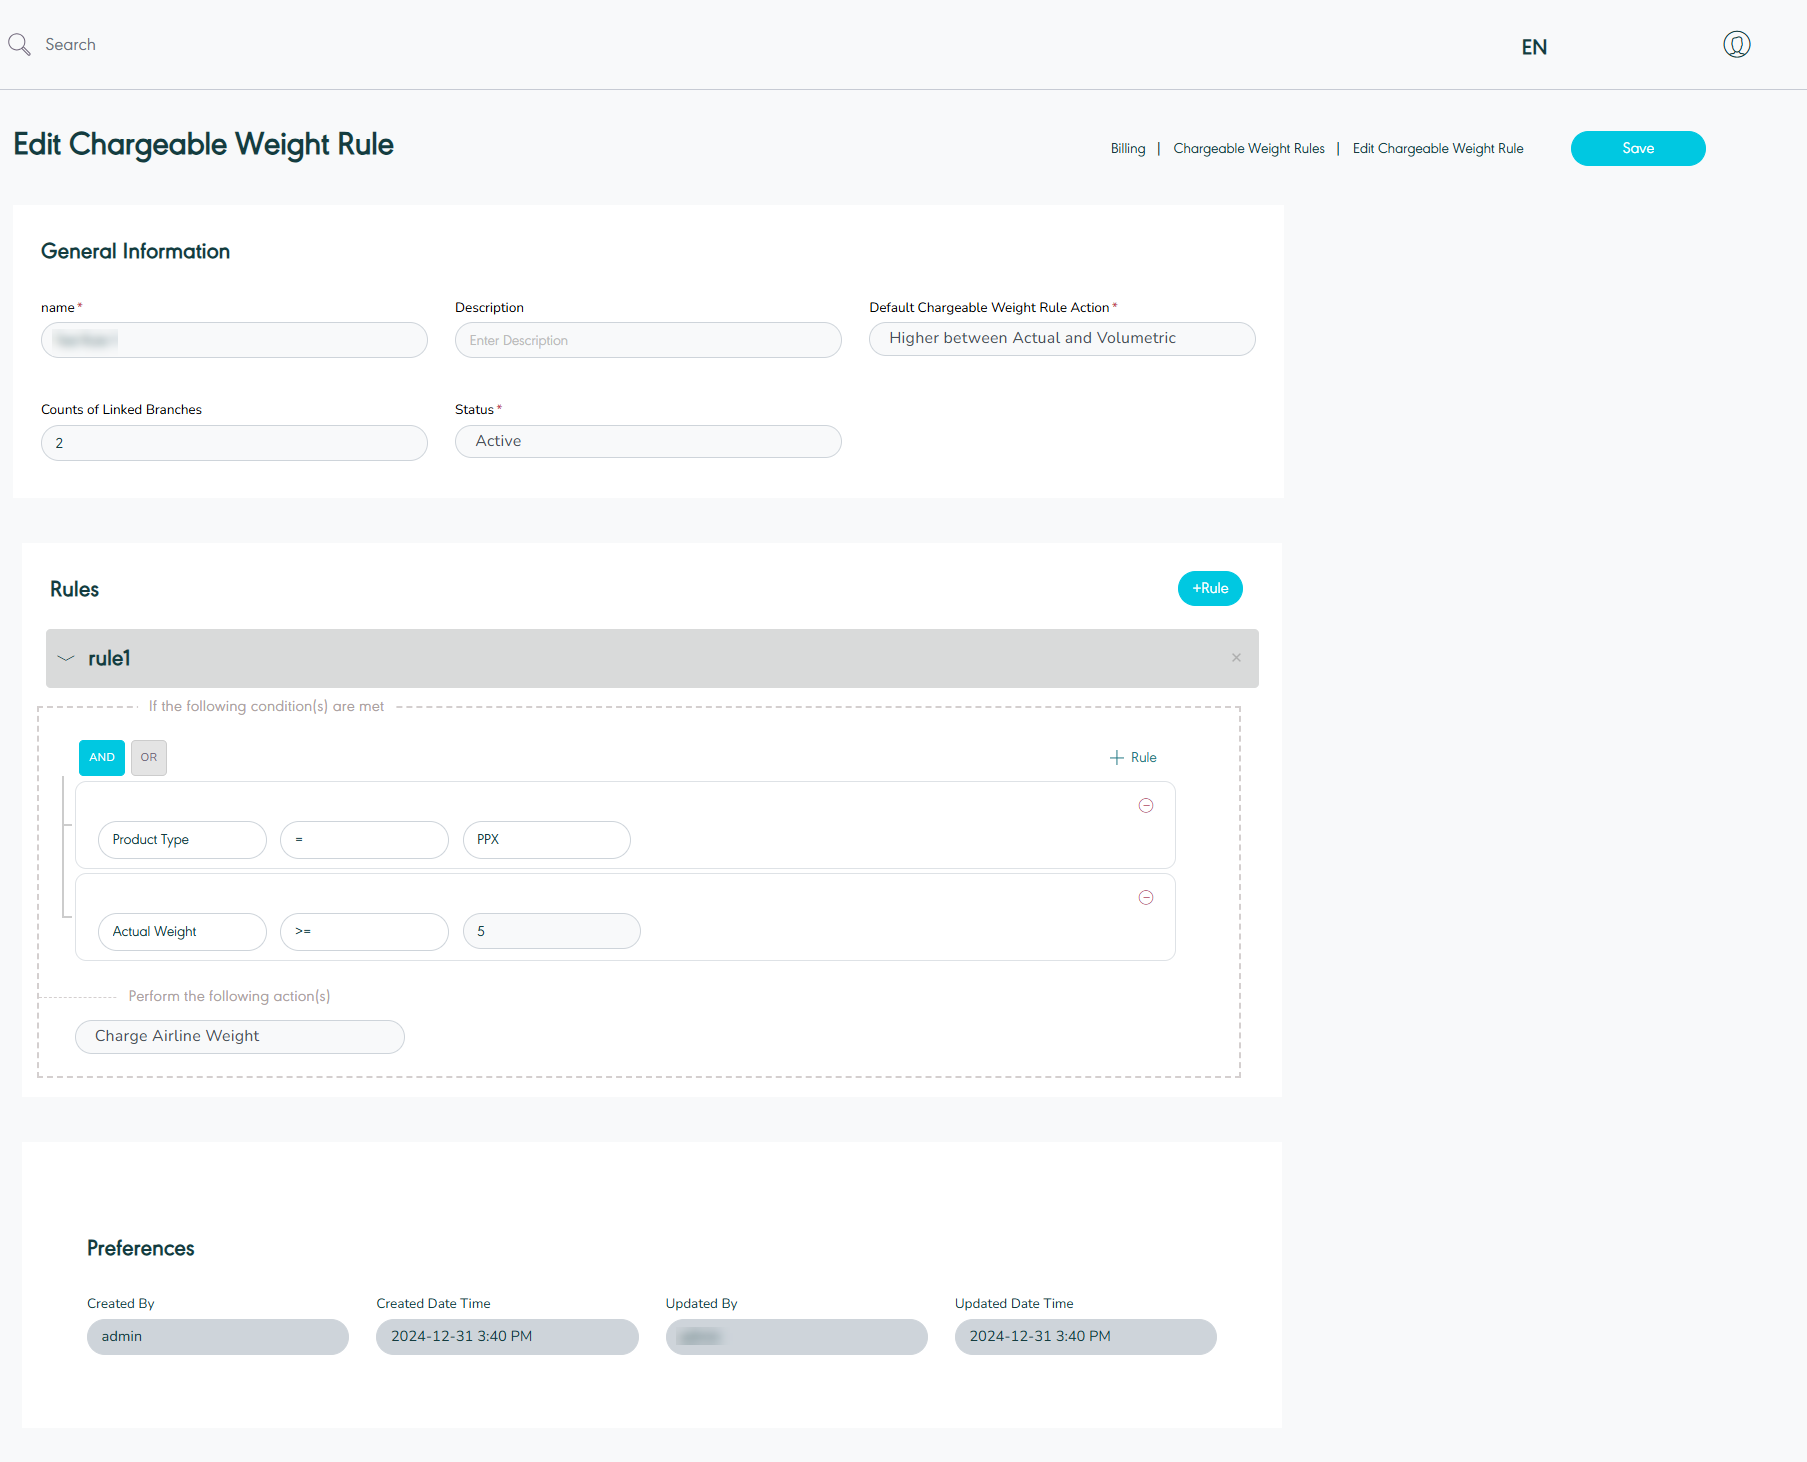
By clicking on Save, the system updates the information successfully.