Glossary
|
Term |
Description |
|---|---|
|
Run Sheet |
A document or digital record that outlines all deliveries or pickups assigned to a courier for a specific route. It includes details such as the stops, timeframes, and associated shipments. |
|
Courier |
An Individual responsible for the transportation and delivery of goods as outlined in a Run sheet. This role is critical in ensuring that the logistics operations adhere to the planned schedule and that all items are delivered to their intended destinations efficiently and on time. |
|
Route |
A pre-planned area that is assigned to the courier for efficiently manage the delivery tasks. |
|
Trip |
The physical movement or journey of a courier during one or several routes (with one or more Run Sheets associated with a single trip). It monitors the courier's progress from the beginning to the end of the trip. Initiating a trip triggers route optimization, and operations debriefing will be carried out using data collected from the Trip. |
|
Task |
The delivery activity type assigned to the courier can be one of the following: Delivery, Pick-up, or Momrah. |
|
Route Optimization |
Upon initiating, the system will trigger the trip’s route optimization for the validated Run sheet. |
|
Delivery Exception |
A status indicating that a package cannot be delivered as scheduled due to unforeseen circumstances by the courier or consignee for an issue during the delivery process. |
|
MOMAH |
Ministry of Municipal and Rural Affairs. |
Run Sheet Module
The Run Sheet will be created in two ways by the following stakeholders:
-
The supervisor via the Web portal.
-
The courier via the Mobile application from 'Honeywell' device or the any Android mobile 7.0 and above.
1. Create Run Sheet
The courier can create the Run Sheet in order to start the delivery activities as follows:
1.1 Select route
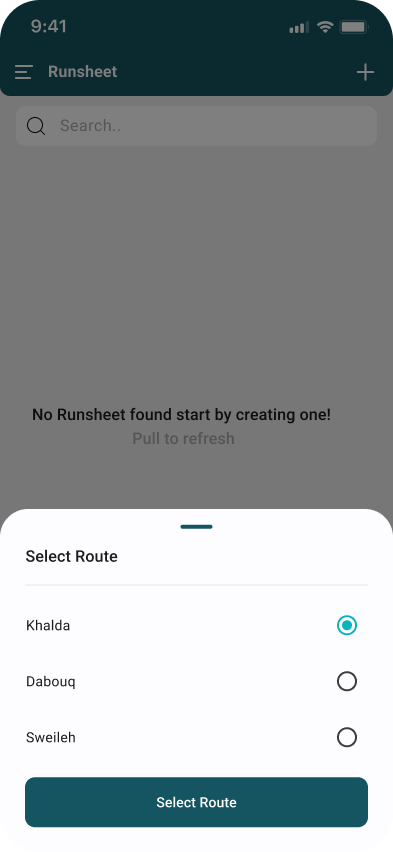
The courier can “Create Run Sheet" by clicking on ‘Select Route’ to select the targeted destination area(s).
1.2 Create Run Sheet
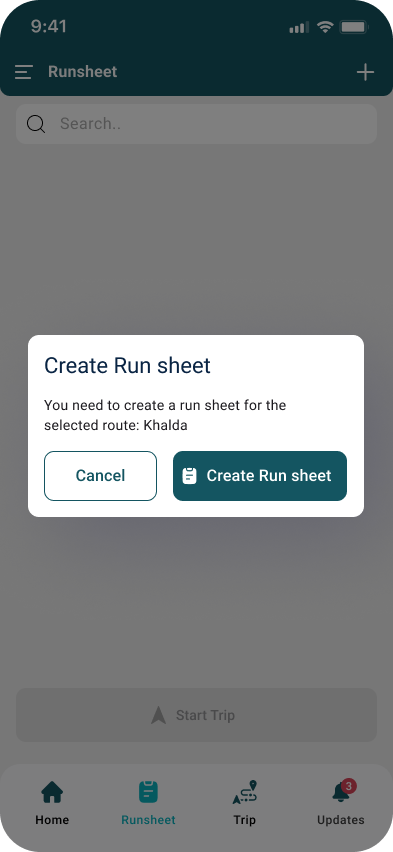
The courier can click on ‘Create Run Sheet’ to add the shipments (AWBs) for the run sheet.
1.3 Scan Shipments
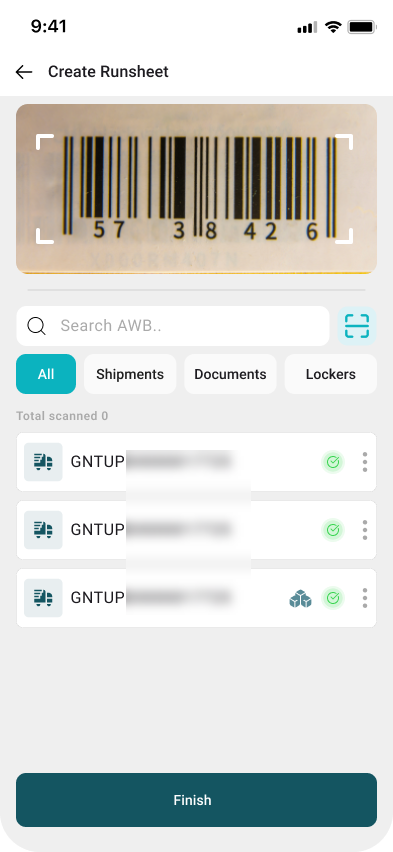
The courier can start scanning or add the shipments numbers manually, to validate and added to the Run Sheet accordingly. Successfully validated shipments will be highlighted in green.
-20250430-082736.png?cb=663be02f881d64a0191d5360da58c683)
-
Multi Piece: When this icon appears, the courier can tell that this shipment contains multiple pieces.
Note: If a shipment contains multiple pieces, the courier must scan the related shipment for validation.

-
Pickup: When this icon appears, the courier can tell that this shipment is a pickup shipment.
-20251012-111558.png?cb=c2cc5c67f2346b555e1198065224ff5a)
-
Virtual Shipments: When this icon appears, the courier can tell that this shipment is a verification shipment.
-20251012-111806.png?cb=8a71c5f3d2c383dd42d789a50ee2c685)
-
Lockers: When this icon appears, the courier can tell that this shipment is a parcel station shipment.
By clicking on Finish, the courier will complete the operation.
Note: If the shipments are added by the supervisor, their status will be set to 'Not Validated' and will be ready for scanning by the courier for validation, as shown.
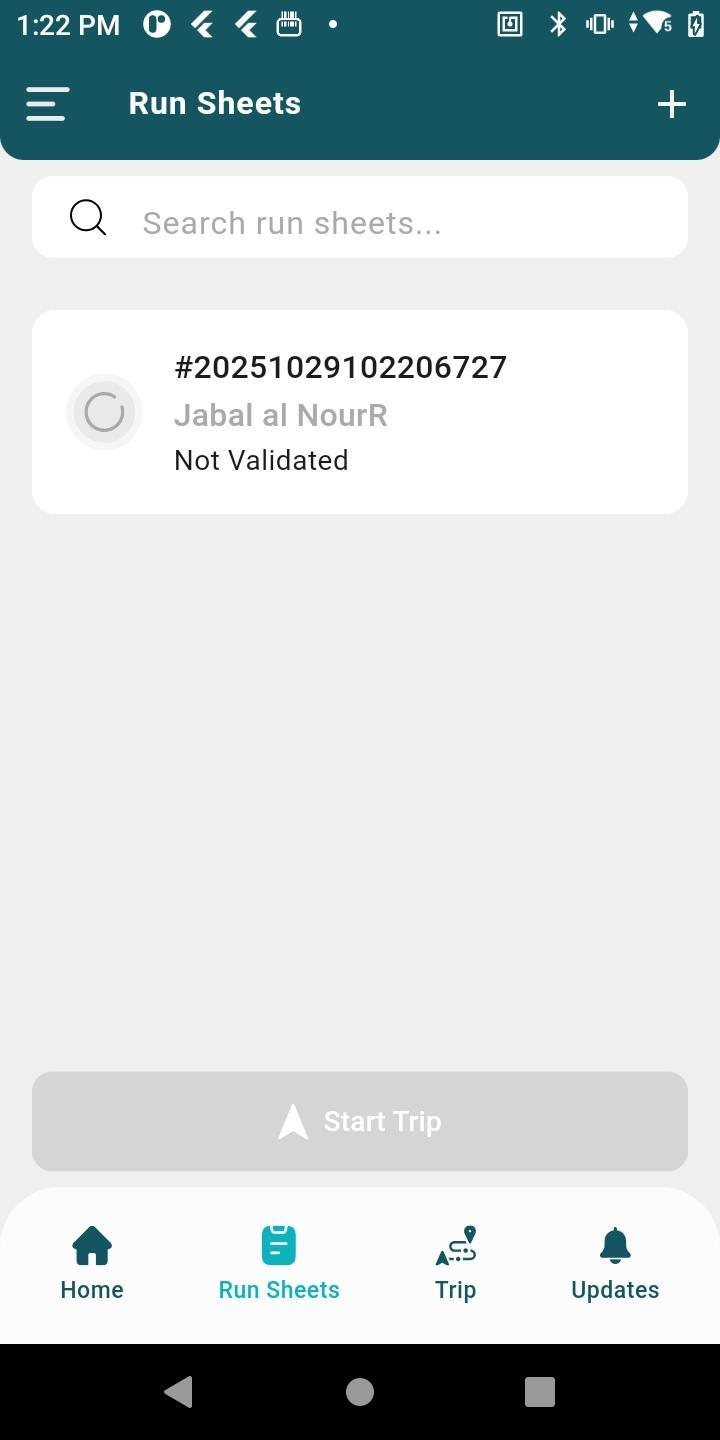
1.4 Marketing Sample
The courier can add marketing samples by selecting the "Scan Marketing Sample" option. after clicking on "Finish" on the Scan Shipments page.
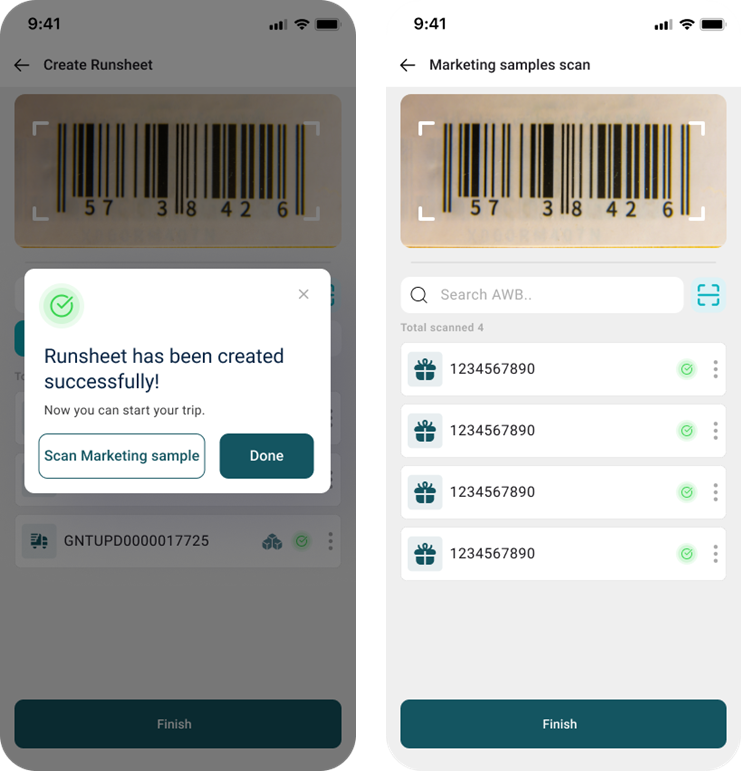
Note: adding marketing samples to the receiver depends if the customer profile support it.
By clicking on Finish, the courier can start the trip.
2. Start Trip
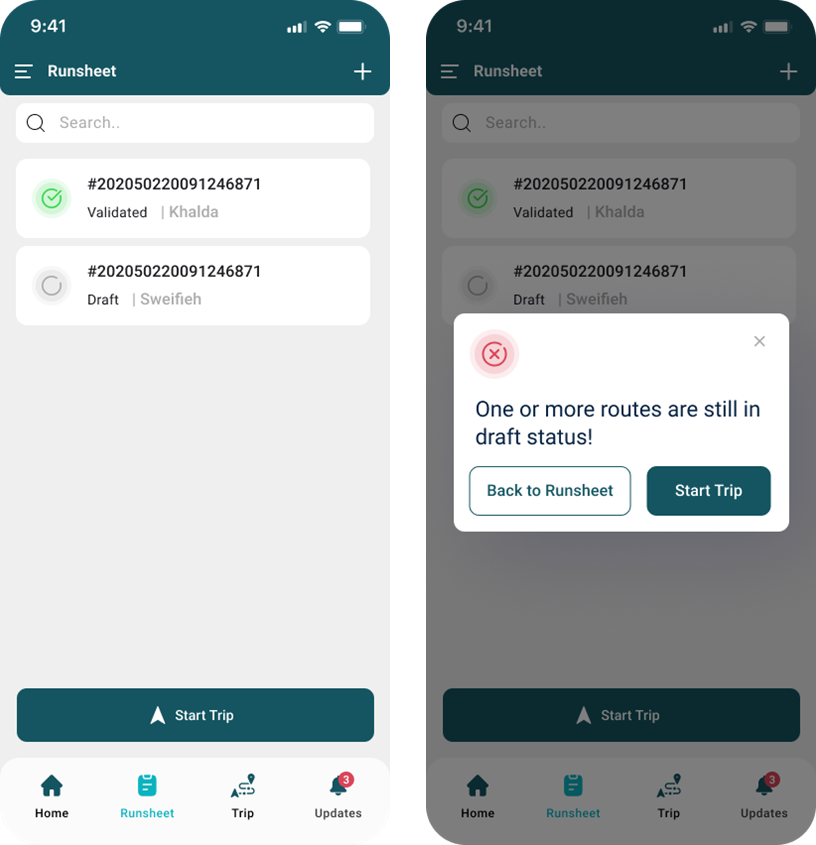
The system will consider the validated Run Sheets and build the optimized route, where the trip can contain multi validated Run Sheets.
-
Start Trip: the courier clicks on ‘Start Trip' in order to proceed with the route optimization.
-
Back to Runsheet: the courier can click on “Back to Runsheet” in order to go back to the runsheet.
2.1 Route Optimization
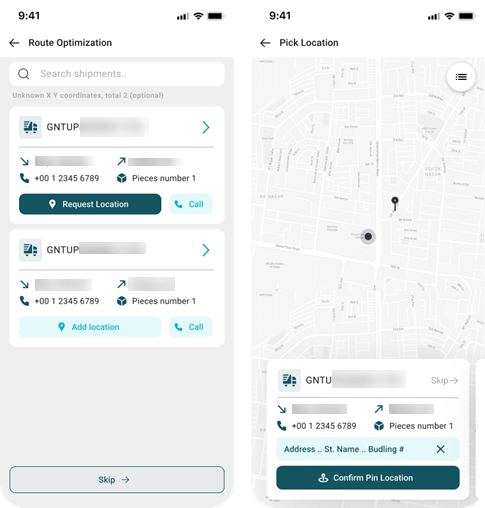
The system will generate an optimized route for delivery tasks including delivery, pick-up, and Momrah within a defined polygon around the area, starting from the nearest location to the warehouse and ending at the farthest location.
-
Request Location: the courier can request the location for any shipment(s), and the system will automatically send a WhatsApp or SMS message to the customer to retrieve their current location.
-
Call: the courier can contact the customer to request the location.
2.2 Start Navigation
The courier must confirm the location by receiving it via WhatsApp or SMS, pasting the location link, confirming the pin location, and then clicking "Start Navigating".
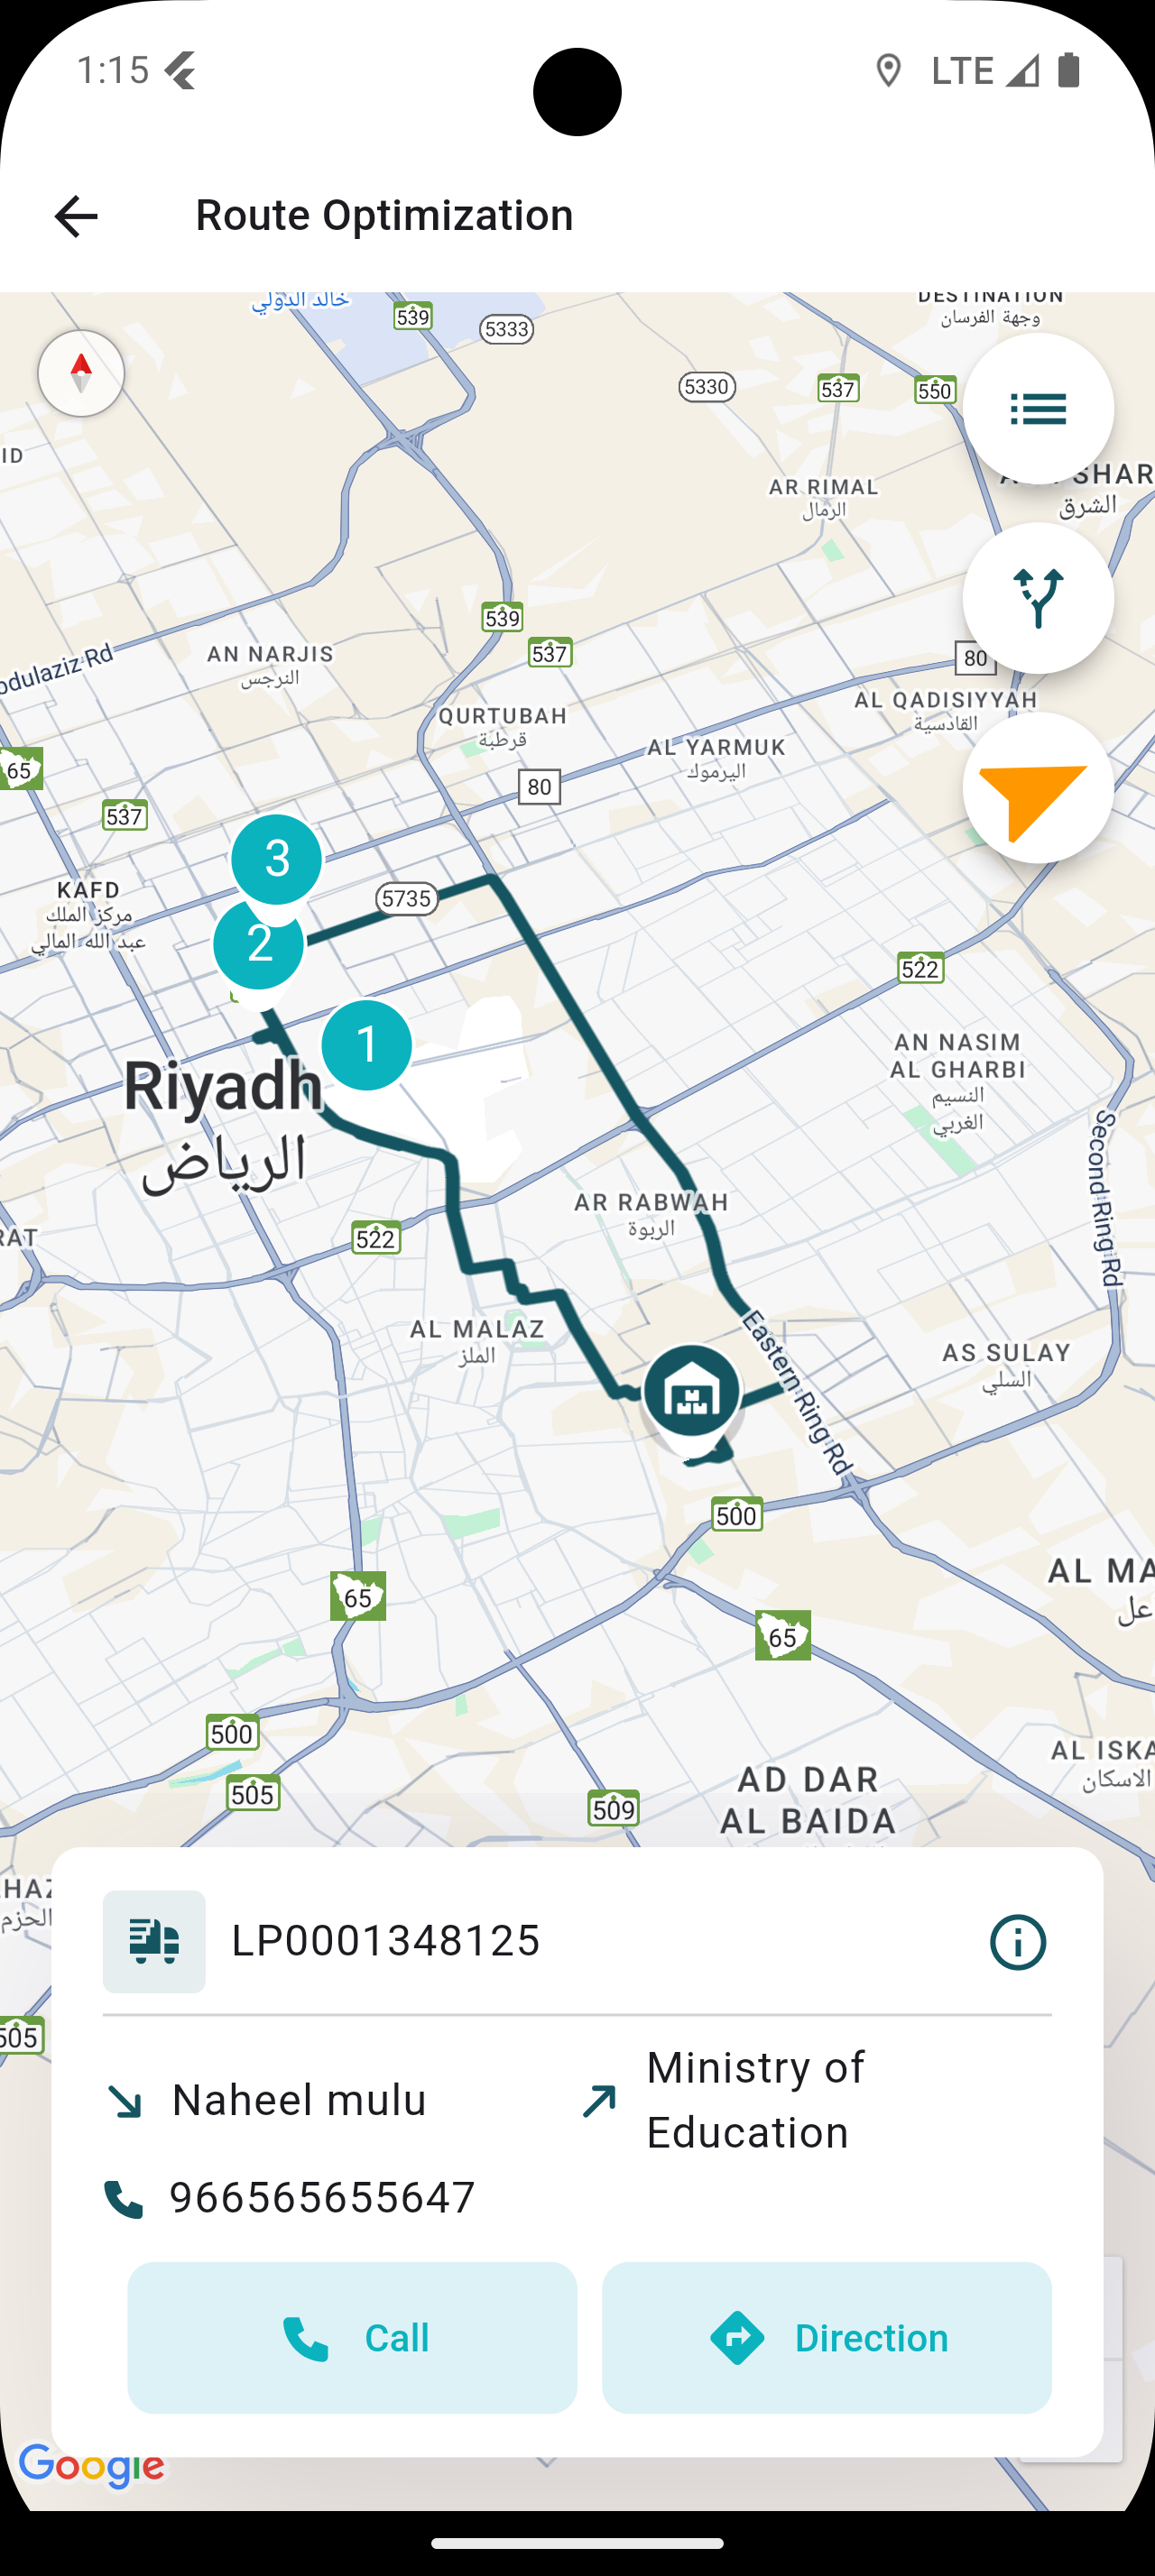
Note: the system will automatically build the correct route for the courier’s journey.

-
Delivery: when this symbol appears, the delivery partner can tell that this shipment is a delivery shipment.
-
Pickups: when this symbol appears, the delivery partner can tell that this shipment is a pickup shipment.
-
Virtual shipments: when this symbol appears, the delivery partner can tell that this shipment is a verification shipment.
-
Parcel Stations: When this symbol appears, the delivery partner can tell that this shipment is a parcel station shipment.
2.3 Stop Information
The courier can view the details about the receiver, destination, shipments, and when the courier arrives at the destination.
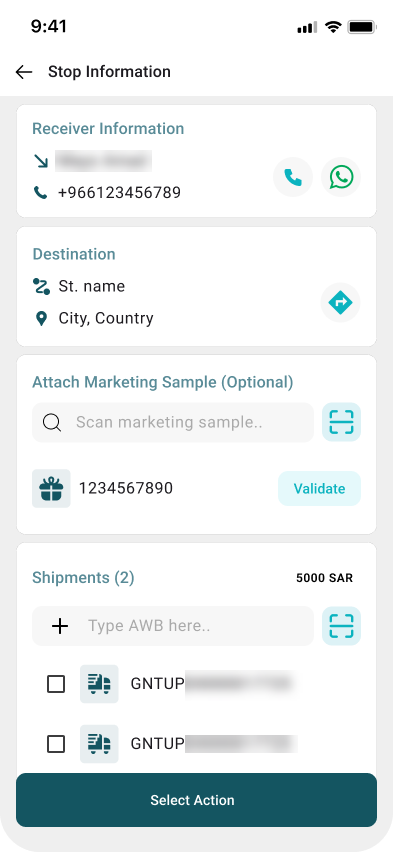
Note: the courier must validate the marketing sample to complete the process.
2.4 Deliver Shipment
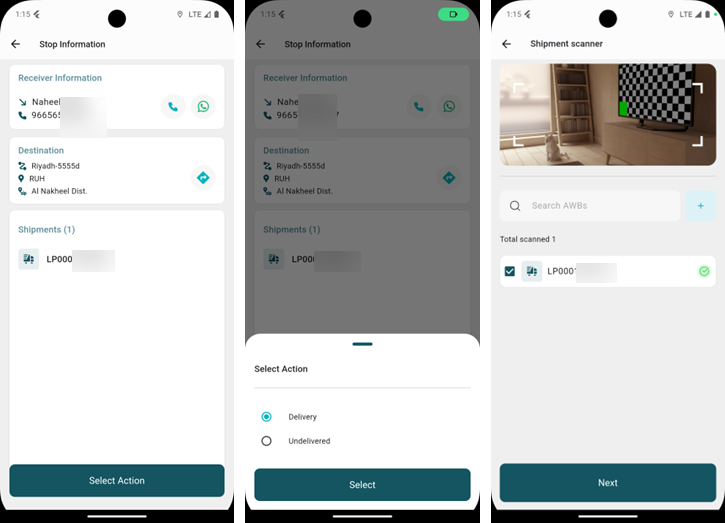
The courier can deliver the shipments after scanning them and then selecting the "Deliver" action.
2.5 Collect Payment
After selecting the action for the shipments ,the payment information will help the courier to know the total amount of the shipments, and the payment method (Cash, Visa card, QR code) of the customer.
-
OTP: one-time password (OTP) is a unique, automatically generated code-usually numeric that is valid for only one time verification and it depends on the customer’s profile.
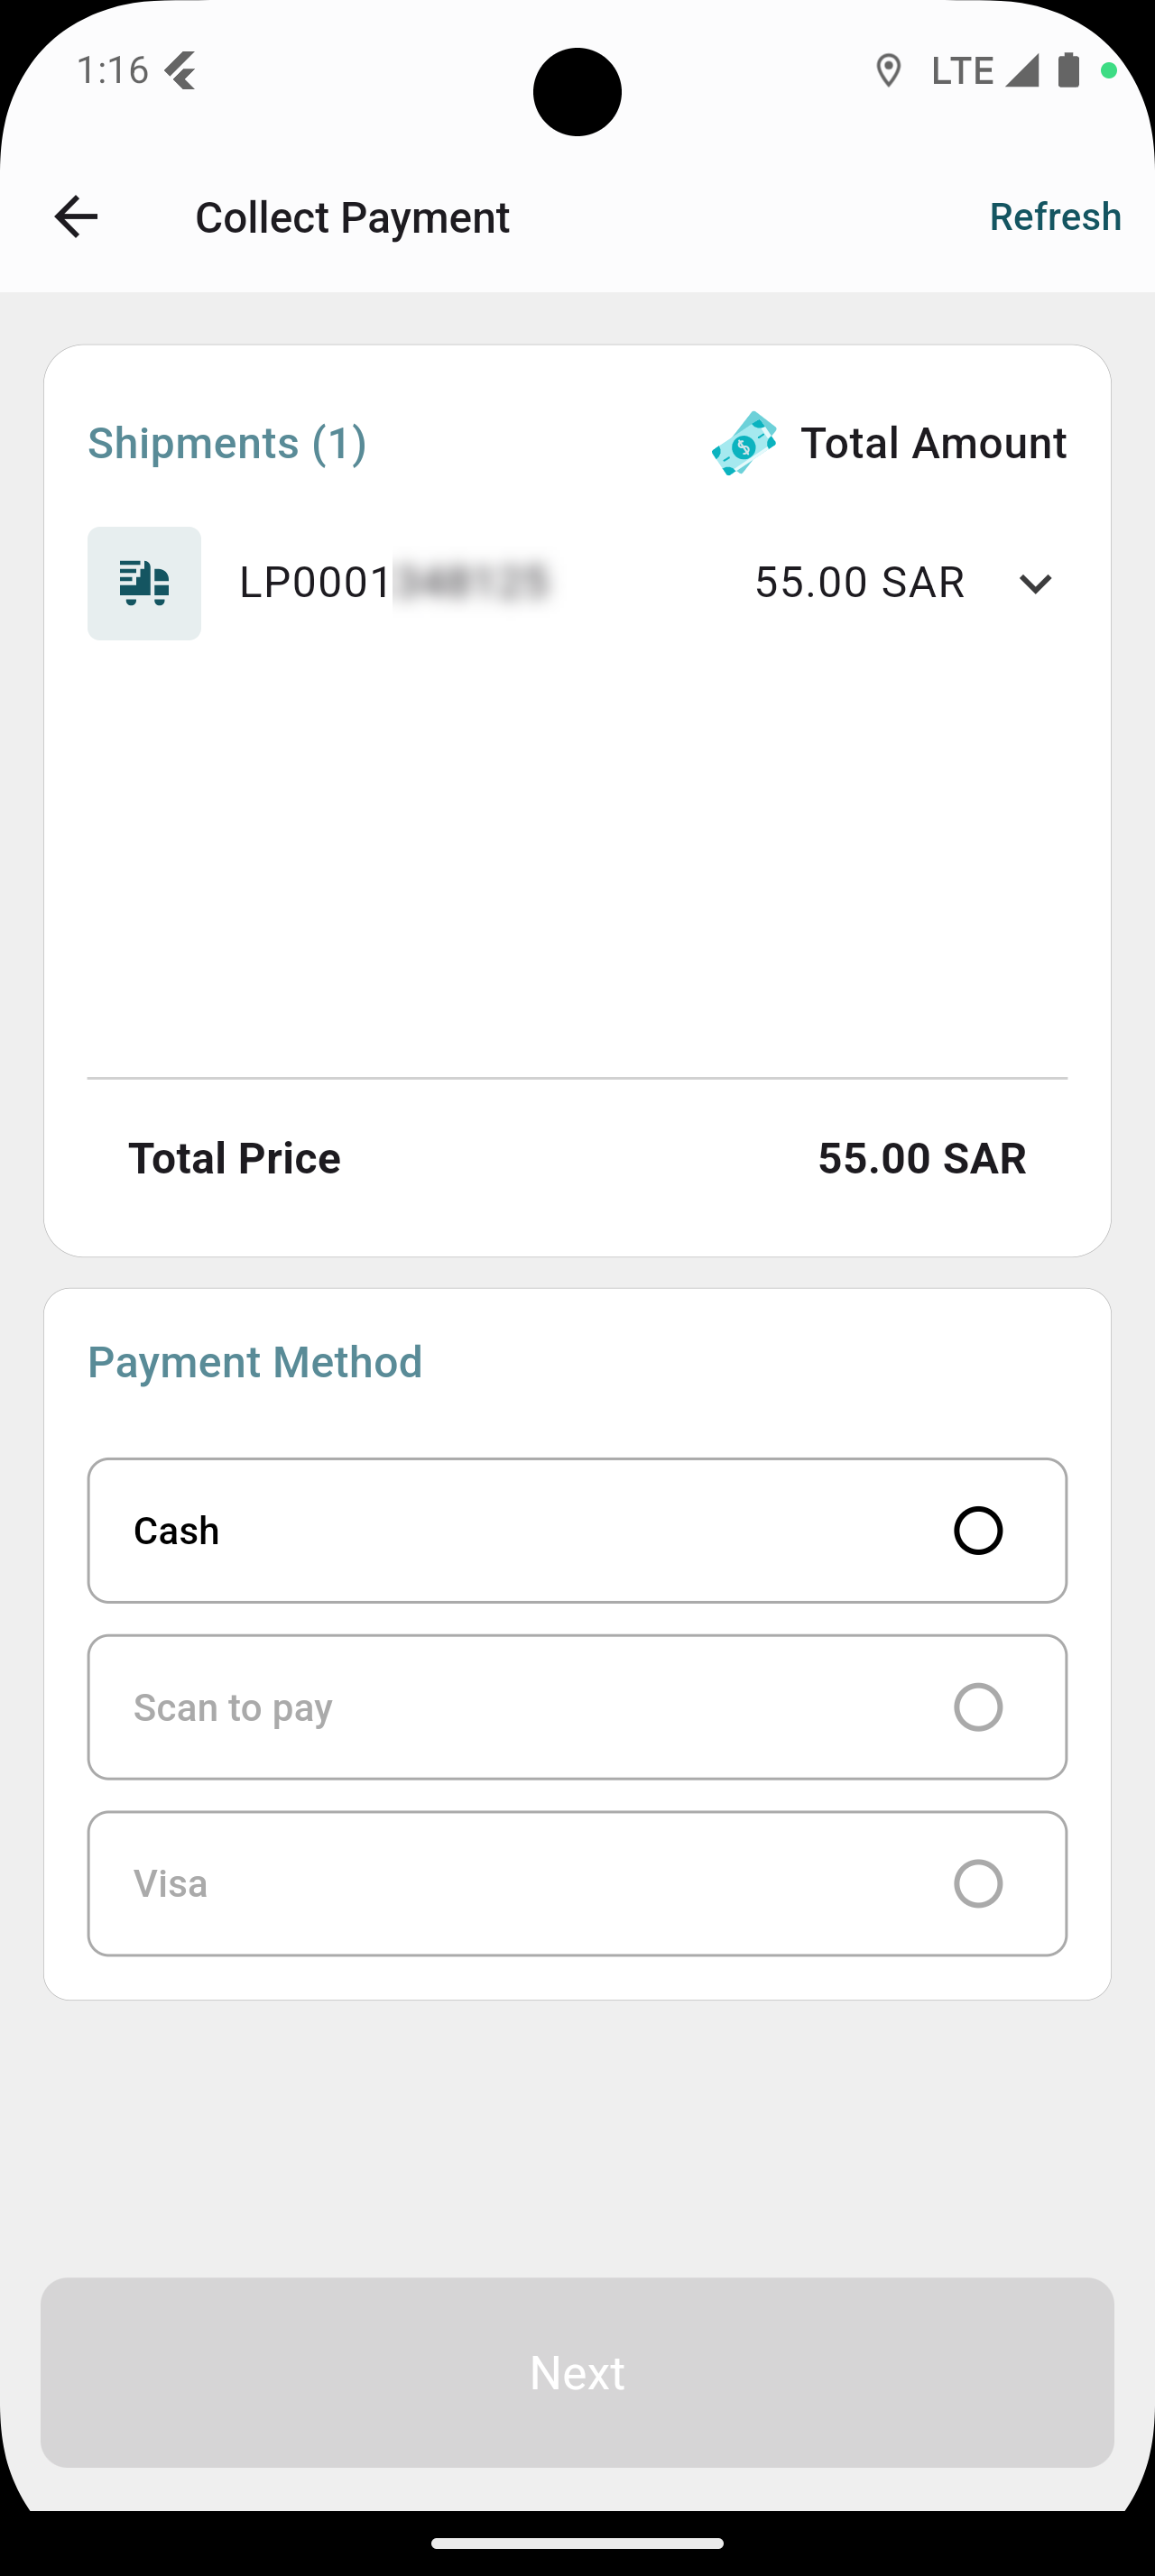
By clicking on Next the system will go automatically to the next step.
2.6 Signature
The courier can attach a picture of the shipment using the camera or by uploading (optional), then obtain the receiver's signature to complete the process.
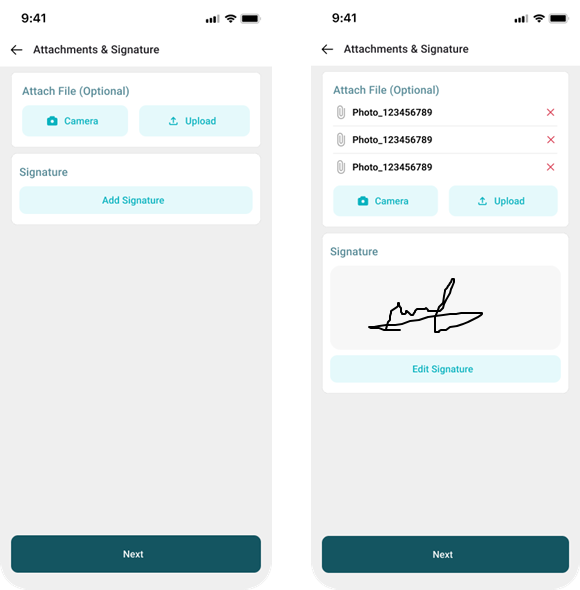
By clicking on Next, the shipment will be delivered successfully and highlighted in green as delivered.
3. Undelivered Shipment
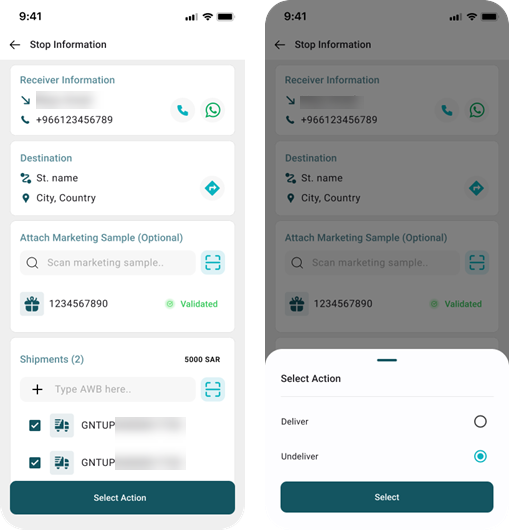
The courier can view the details of a shipment—including receiver information, destination, and shipment status—if the shipment is damaged or has an exception preventing delivery. To do this, the courier should select the specific shipment and then press 'Undeliver.'
-
The courier will mark the shipment as undelivered and then select the appropriate delivery exception reason for not completing the delivery.
Delivery%20Exception-20250503-144935.png?cb=5ef0c61e16ff6698db22a61413b6a999)
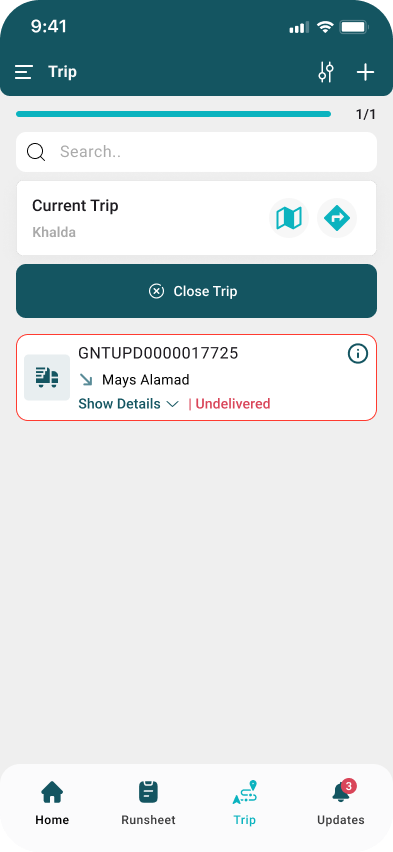
By clicking on Submit the delivery exception will be successfully added and the trip will be highlighted in red as Undelivered on the trip tap.